Exonita POS · Supermarket · Tenant Admin guide
Tenant Admin
Set up your store once (business details, counters, invoice numbers, products, barcodes, staff and security), then receive stock, close the business day and check your reports.
What you can do
- Everything a cashier can do
- Set up business details, counters, invoice numbering, products, barcodes and labels
- Add staff, choose what each role can do and decide how staff sign in
- Choose which transactions ask staff to confirm it's them
- Change prices and give discounts at the counter, and set up offers
- Receive stock, see what's left and how it moved
- Approve expenses, check every till and close the business day
- See dashboards, reports and GST returns, and export them
Ask your administrator
- Your licence decides how many billing counters you can register. To add more, contact Exonita support.
- If you lose the phone with your authenticator app, another administrator can reset your two-step verification. If you are the only administrator, contact Exonita support.
Your administrator can change what your login can see. If a button in this guide is missing for you, ask them.
Your day at a glance
- 1Open Exonita POS
- 2Enter your business details
- 3Set your branch to Supermarket
- 4Register a billing counter
- 5Set invoice numbering
- 6Add categories, units and tax
- 7Add your products
- 8Print barcodes and shelf labels
- 9Check the invoice layout
- 10Choose how the counter bills
- 11Add your staff and choose what they can do
- 12Decide how staff sign in
- 13Choose which transactions ask staff to confirm
- 14Set alerts and guided tours for staff
- 15Receive and count stock
- 16Check and approve expenses
- 17Close the business day
- 18Check sales and reports
- 19Set delivery zones and message customers
Task 1
Open Exonita POS
Start from the Supermarket Dashboard and find each screen in the left menu.
WhereApp launcher → Billing App
-
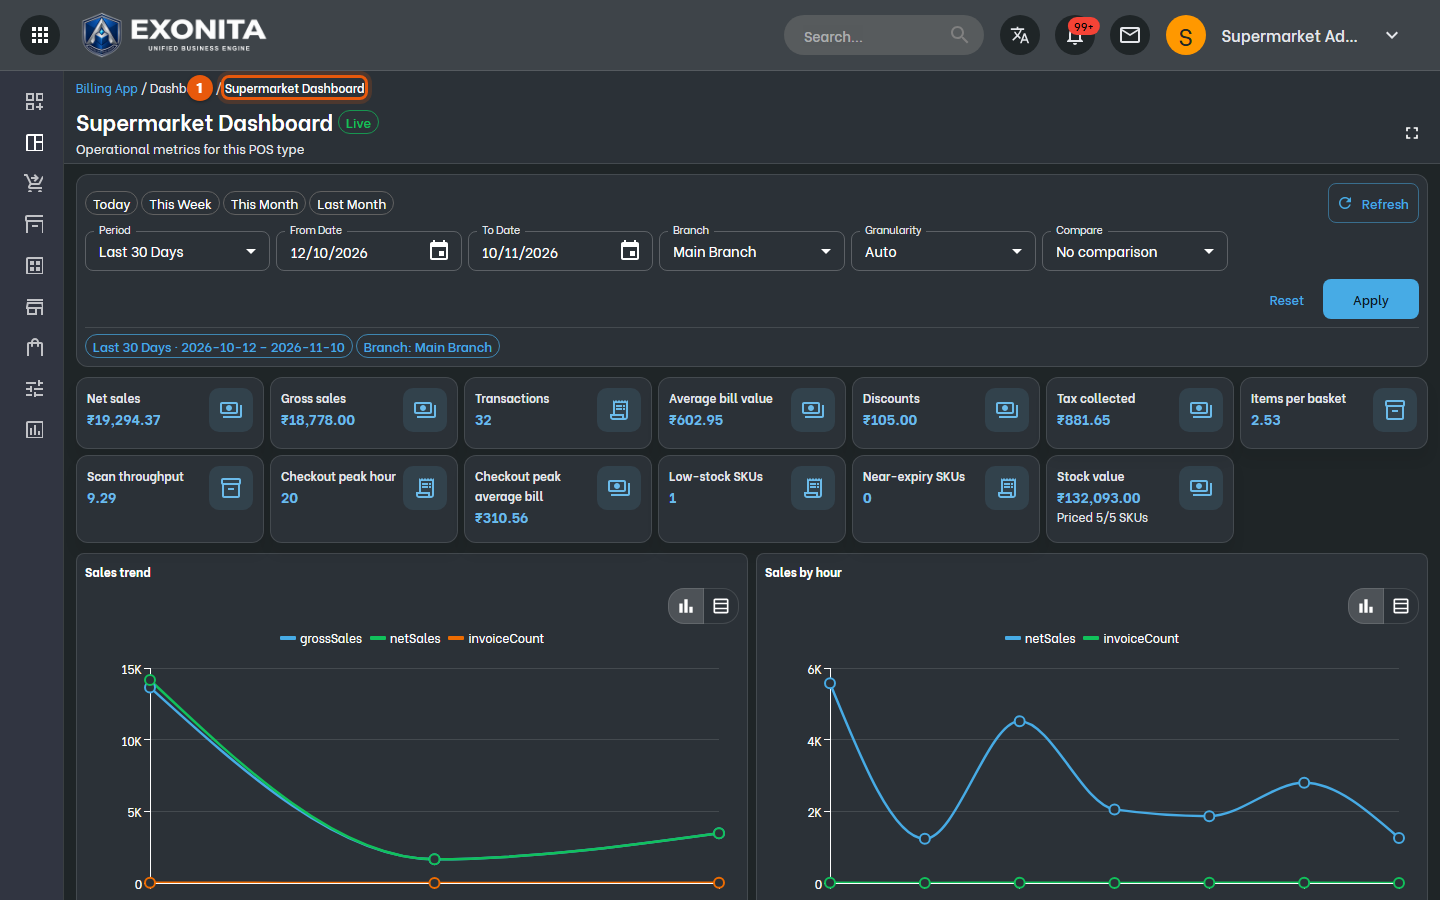
Sign in and open Billing App from the app launcher (Exonita POS shows as Billing App there). It opens on the Supermarket Dashboard. The icons on the left open every other screen.
You'll see: You see today's sales, bills and stock for your branch.
-
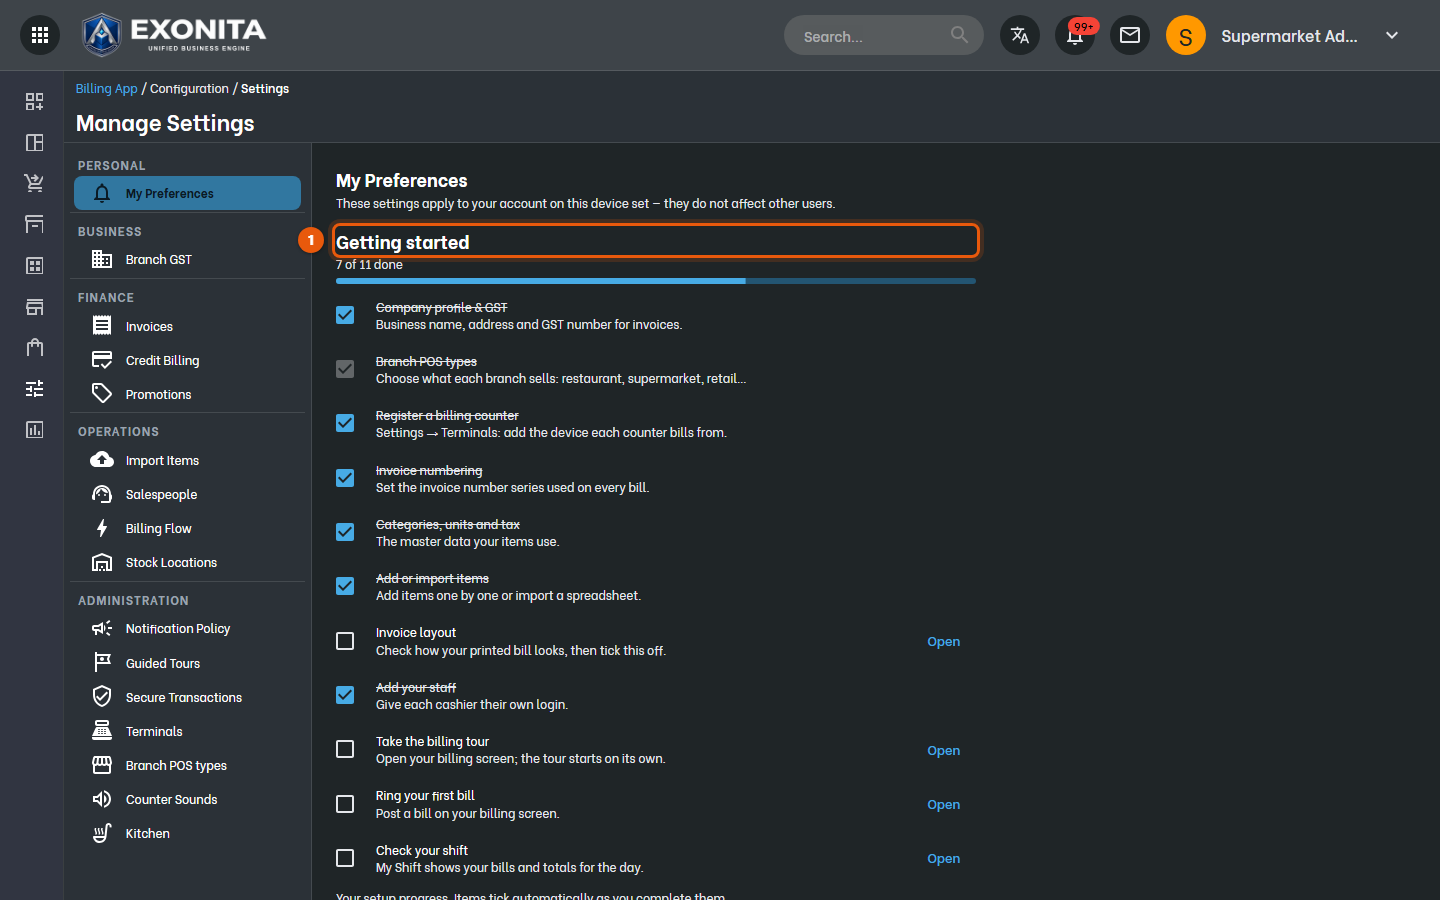
Open Settings → My Preferences. Getting started lists the 12 setup tasks in order and ticks each one as you finish it. This guide follows the same order.
You'll see: You see how many setup tasks are done. Select Open next to a task to go to its screen.
TipThe floating Getting started button can be hidden. Select Show The Button Again here to bring it back.
Task 2
Enter your business details
Set the business name, address, GST number and UPI ID printed on every bill.
WhereCommon App → Settings → Company Profile
-
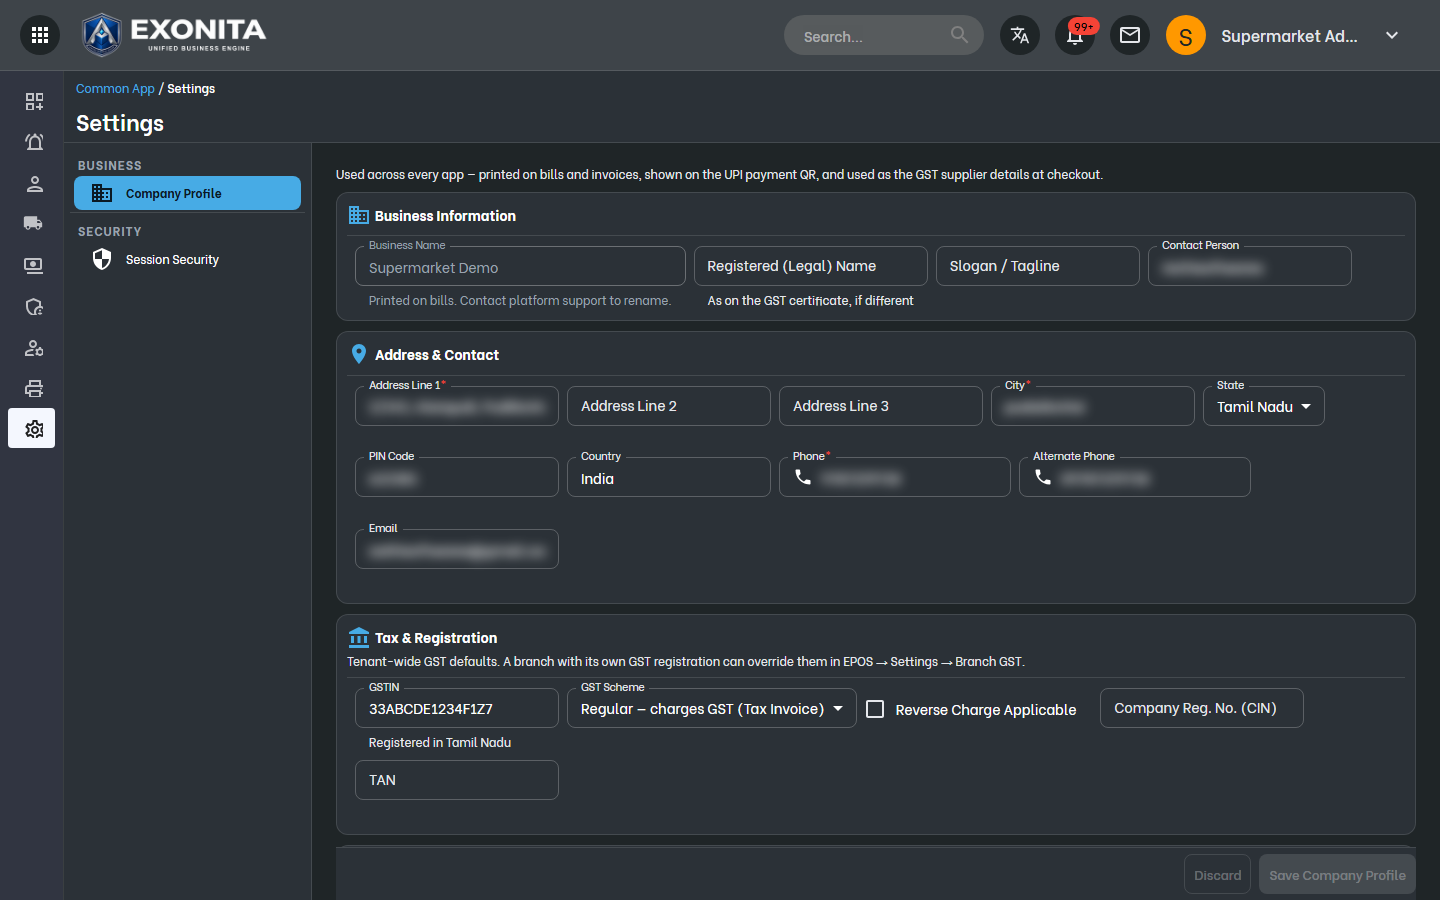
Open Common App from the app launcher, then Settings. On Company Profile, enter your business name, address, phone, GSTIN and UPI ID, then save.
You'll see: Every app, including Exonita POS, prints these details on bills and receipts.
-
Only if a branch has its own GST registration or address: in Exonita POS, open Settings → Branch GST and fill in Branch GSTIN and Branch State. Leave a field blank to use the Company Profile value.
You'll see: Bills from that branch print the branch's own GST details.
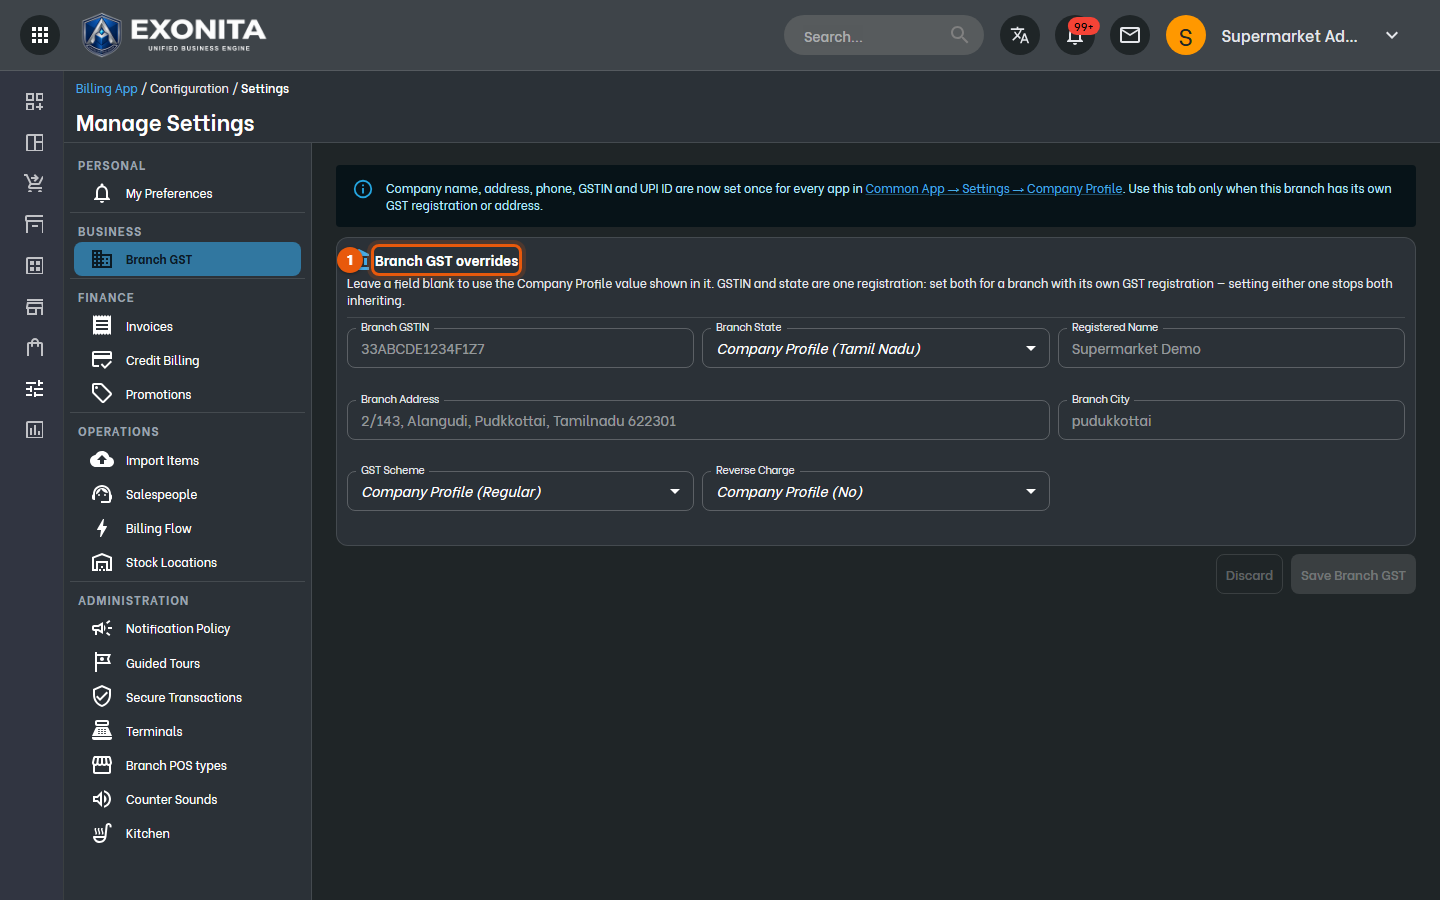
ImportantGSTIN and state are one registration. Set both for a branch with its own registration.
Task 3
Set your branch to Supermarket
Choose what each branch sells, so the right counter opens.
WhereSettings → Branch POS Types
-
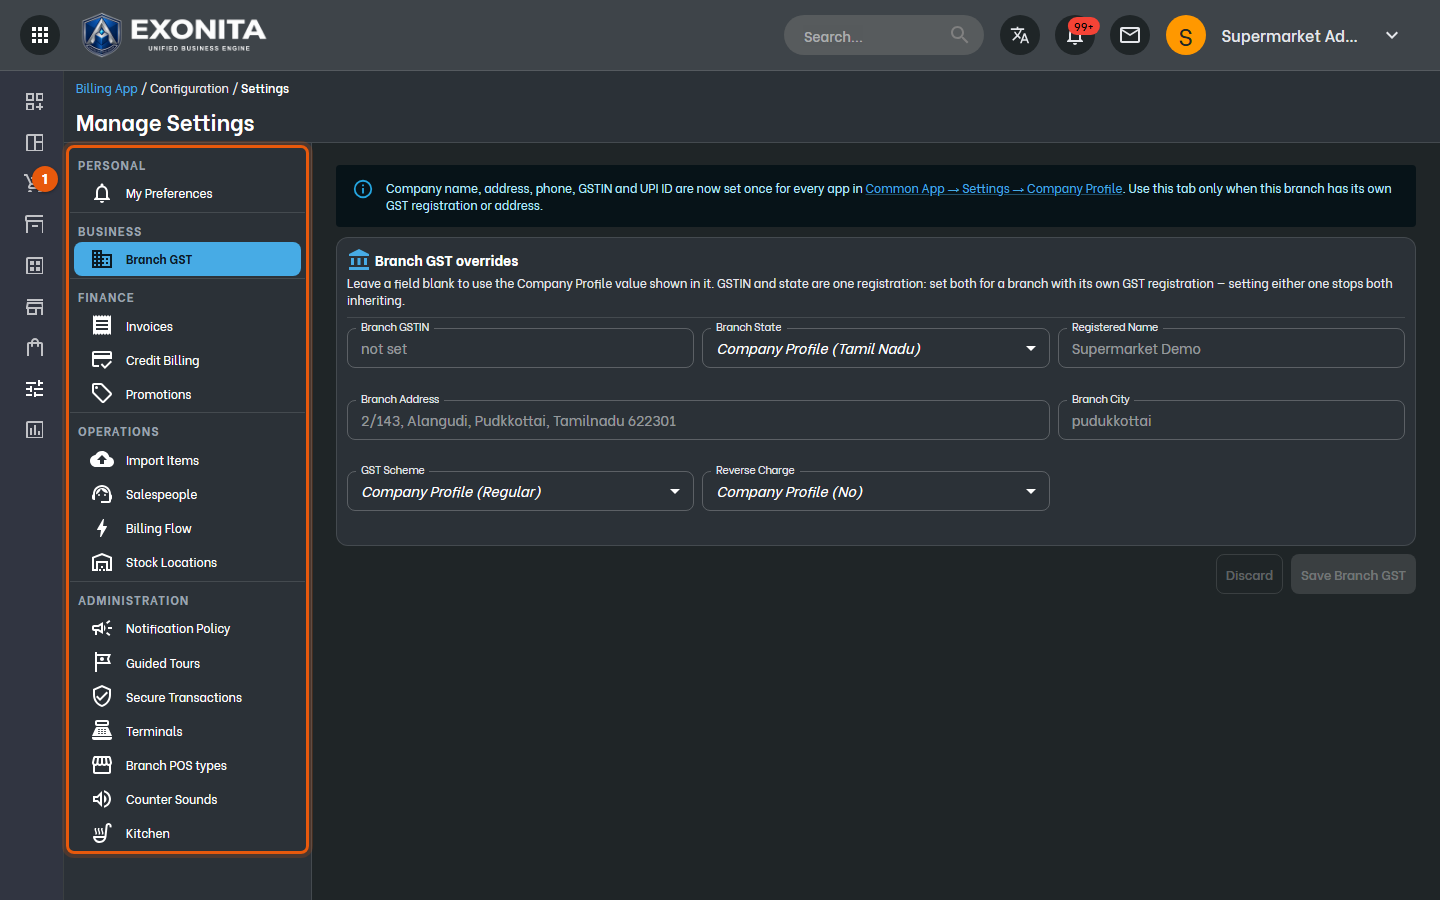
Open Settings. The sections are grouped on the left: Personal, Business, Finance, Operations and Administration.
You'll see: Select a section to open it on the right.
-
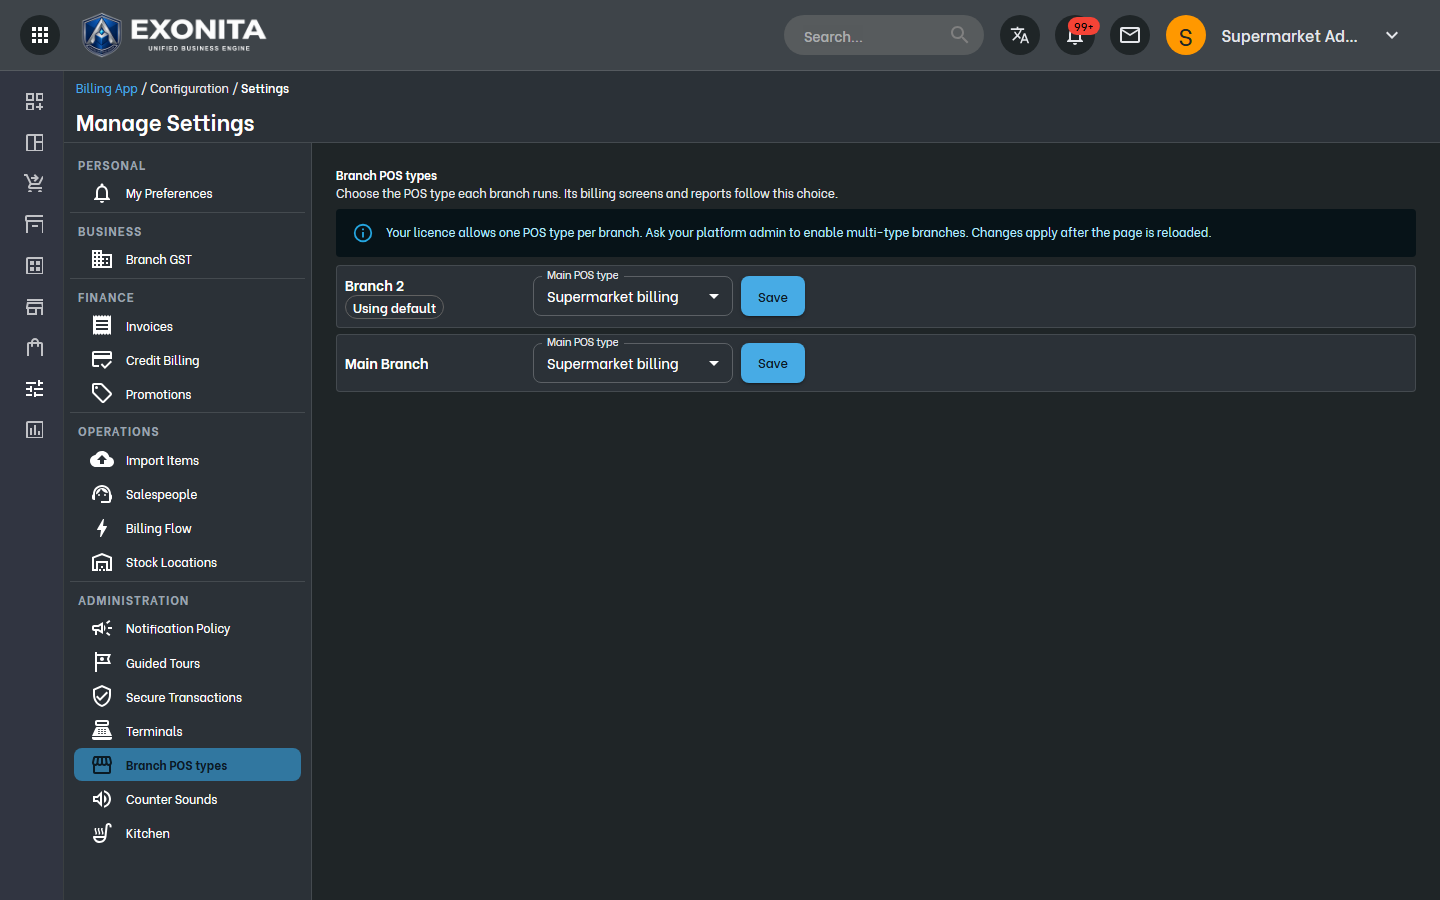
Select Branch POS Types. For each branch, choose Supermarket billing as the Main POS type and select Save.
You'll see: Cashiers at this branch get the supermarket counter.
Task 4
Register a billing counter
Allow a computer to bill. Each counter is one terminal on your licence.
WhereSettings → Terminals
-
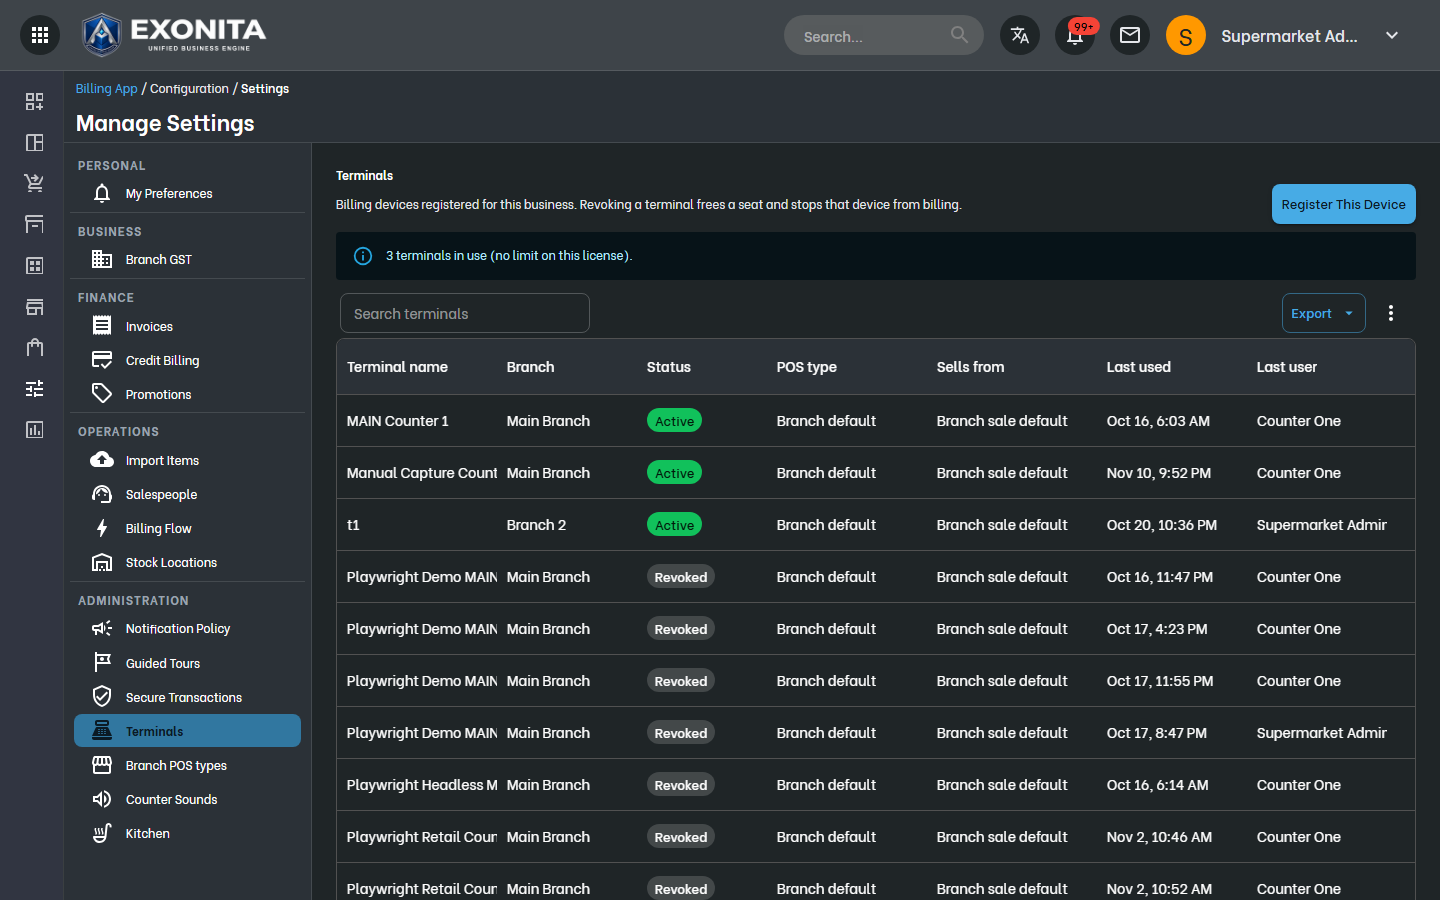
Select Terminals.
You'll see: You see every registered counter, its branch, where it sells from, its last user, and how many of your licence's terminals are in use.
-
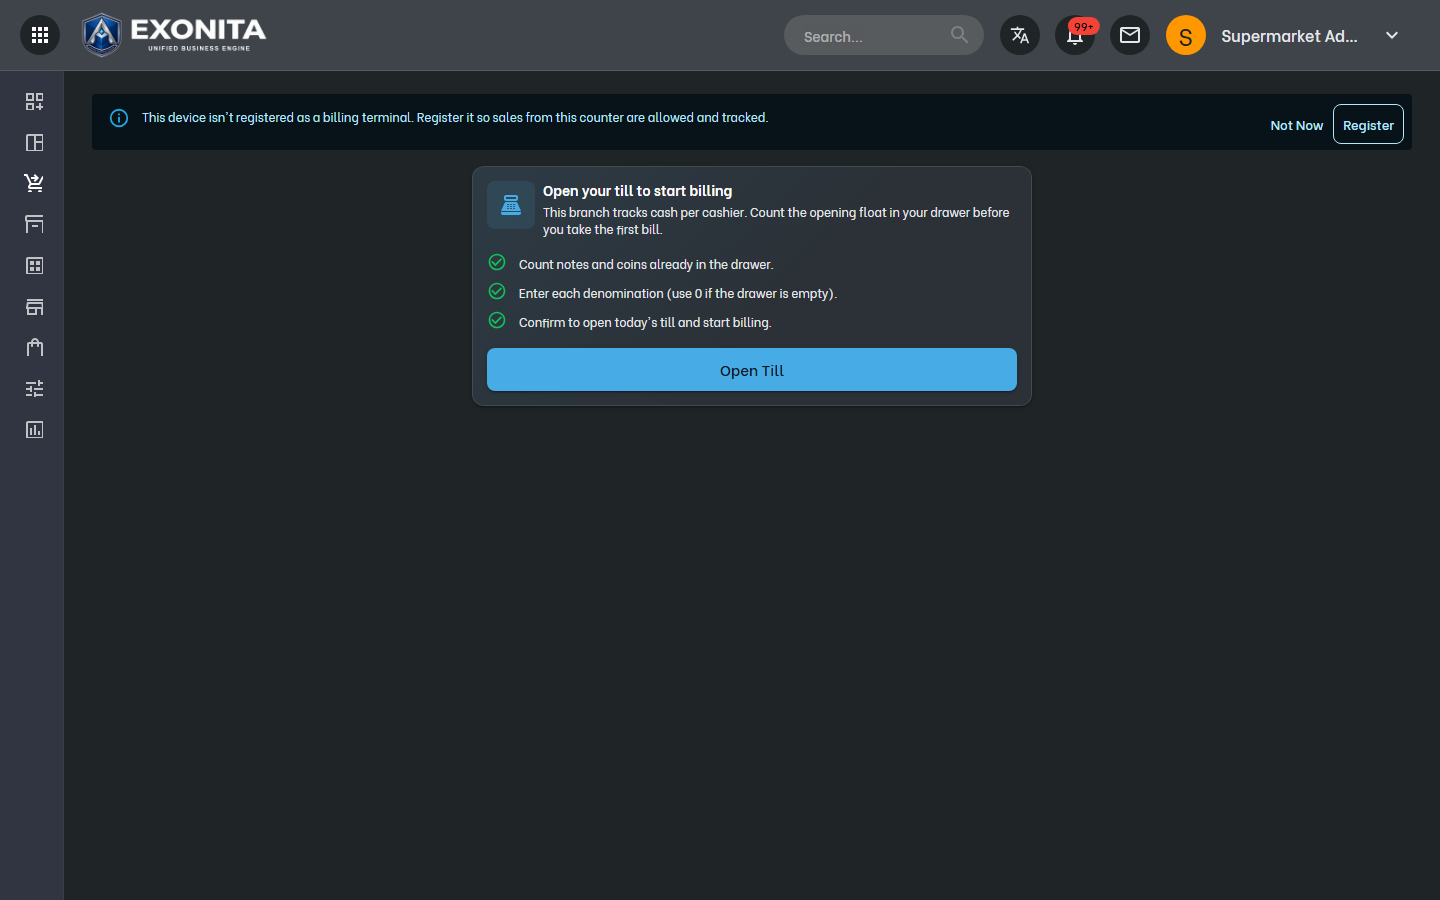
On the computer at the counter, open the supermarket counter. Select Register this device, give it a name such as
Counter 1, and select Register.You'll see: The computer is now a billing counter for your current branch.
TipTo stop a lost or old computer from billing, select Revoke next to it in Terminals. That frees a seat on your licence.
Task 5
Set up the counter PC: full screen and direct printing
Open the supermarket counter full screen every day and print bills straight to the receipt printer, with no print preview. The counter stays full screen while it prints.
WhereOn the counter PC (Windows), before you open Exonita POS
-
Open Windows Settings → Bluetooth & devices → Printers & scanners. Turn off Let Windows manage my default printer, select the receipt printer, then select Set as default.
You'll see: The receipt printer is this PC's default printer. Bills will print on it without asking.
-
Right-click the desktop and select New → Shortcut. For the location, paste
"C:\Program Files\Google\Chrome\Application\chrome.exe" --kiosk --kiosk-printing https://app.exonita.com/epos/billing/store(with the quotes). Select Next, name itSupermarket POS, and select Finish.You'll see: A Supermarket POS shortcut is on the desktop.
TipIf Chrome isn't in that folder, try
C:\Program Files (x86)\Google\Chrome\Application\chrome.exe. For Microsoft Edge, use"C:\Program Files (x86)\Microsoft\Edge\Application\msedge.exe" --kiosk https://app.exonita.com/epos/billing/store --edge-kiosk-type=fullscreen --kiosk-printing. -
Close every Chrome window on the PC, including Chrome in the system tray next to the clock.
You'll see: Chrome isn't running.
ImportantIf any Chrome window is still open, the shortcut opens an ordinary window instead: no full screen and no direct printing.
-
Double-click the Supermarket POS shortcut. Sign in the first time; the PC remembers you after that.
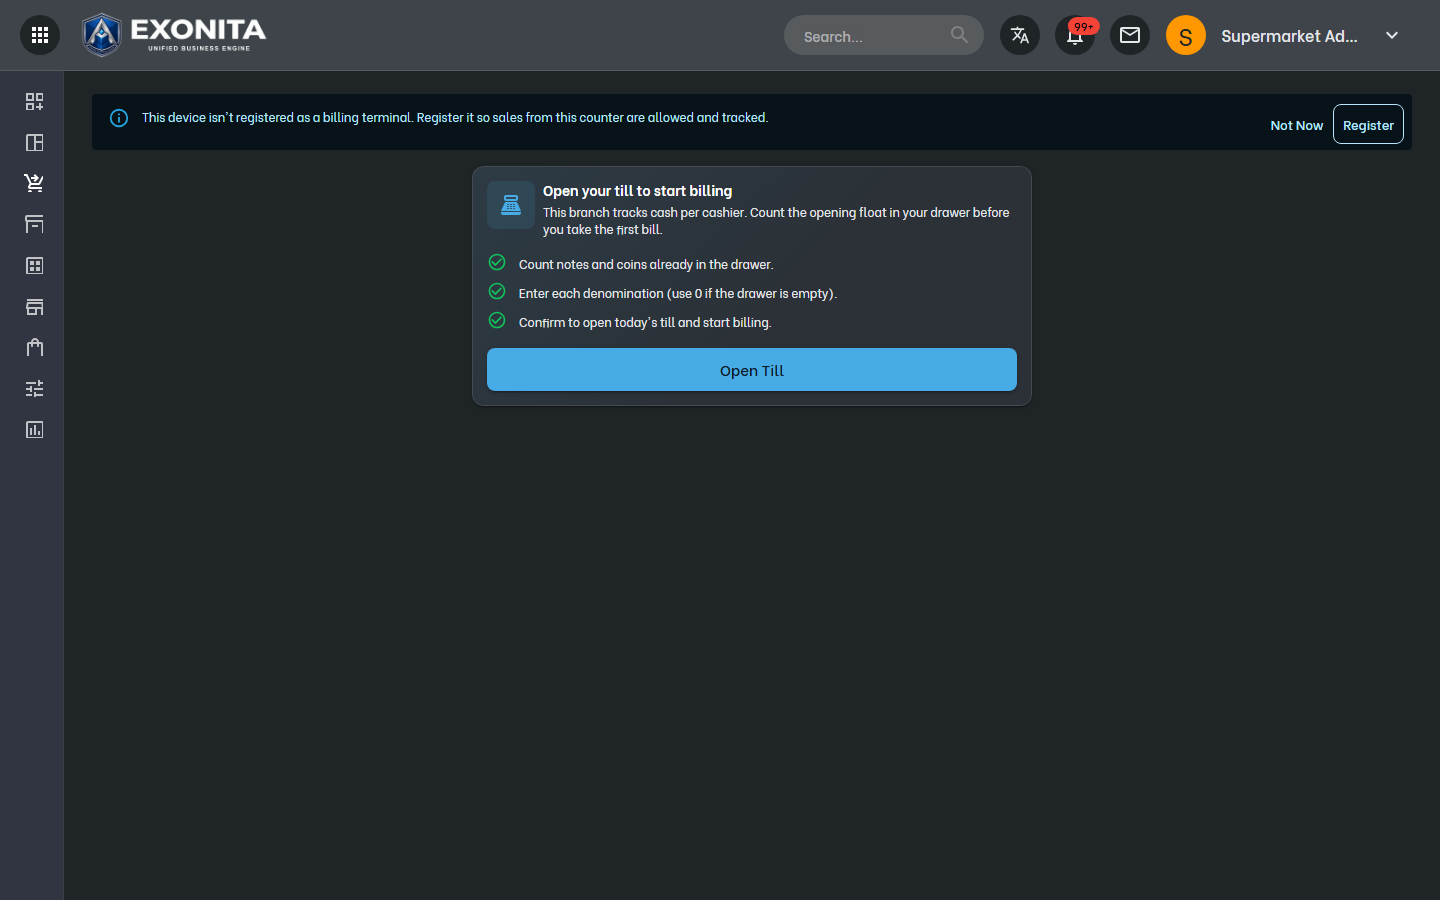
You'll see: The supermarket counter opens full screen, with no address bar or tabs. Each morning it first asks the cashier to open the till. When you print a bill it goes straight to the receipt printer.
TipTo leave full screen, press Alt+F4. To start the counter when the PC switches on, press Win+R, type
shell:startup, and copy the shortcut into the folder that opens. Keep a normal Chrome shortcut for anyone who needs back-office pages.
Task 6
Set invoice numbering
Choose the number series printed on every bill and document.
WhereConfiguration → Configure Serial Key
-
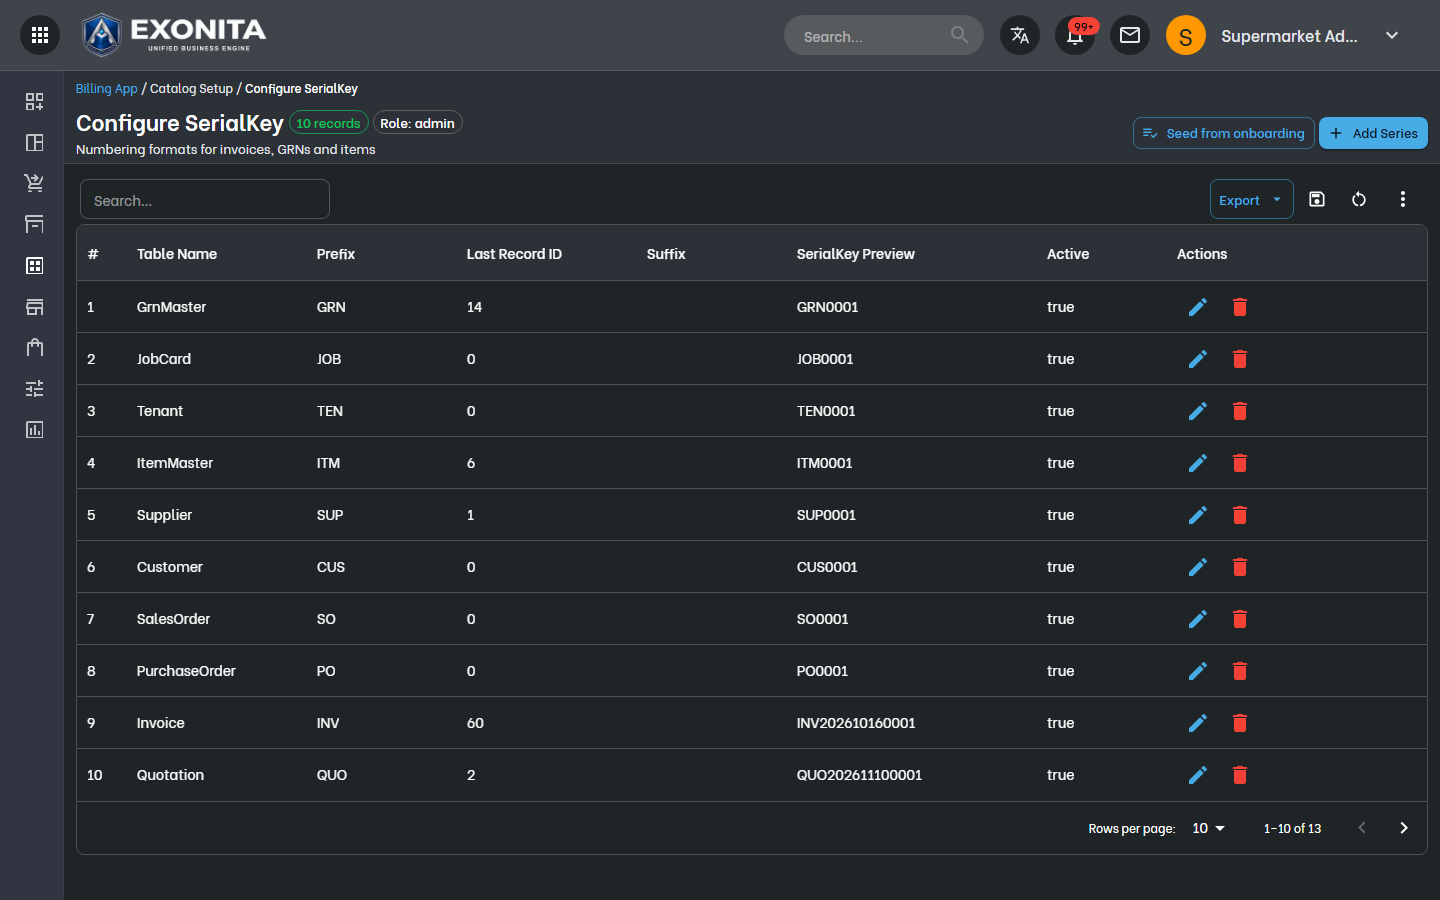
Open Configure Serial Key. Each document type, such as Invoice, CreditNote and Customer, has its own Prefix and number. Select the pencil next to Invoice to change the prefix of your bills.
You'll see: SerialKey Preview shows how the next number will look. New documents use these series.
ImportantSet this before your first bill. Changing it later can leave gaps in your invoice numbers.
Task 7
Add categories, units and tax
Create the lists your products use.
WhereCatalog Setup → Master Data
-
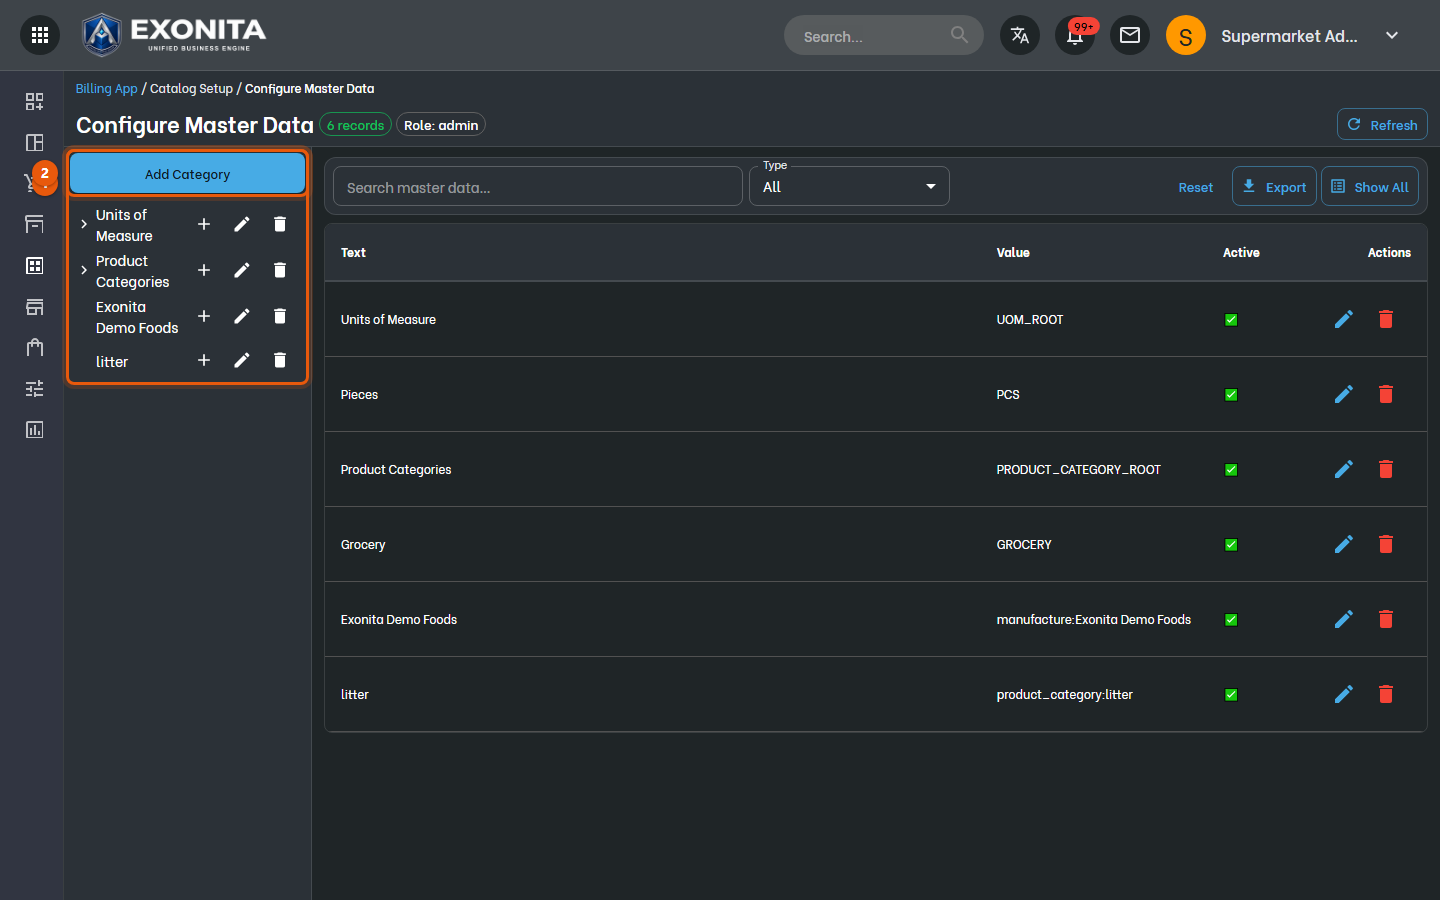
Open Master Data. Choose a list on the left, such as categories or tax, and select Add Category (or Add Child for a sub-category).
You'll see: The new entry can be used on your items.
TipCreate aisle-style categories, such as Grocery, Dairy, Personal care and Household. Reports and offers work per category.
Task 8
Add your products
Put every product in your catalogue with its price and tax.
WhereInventory → Item Master
-
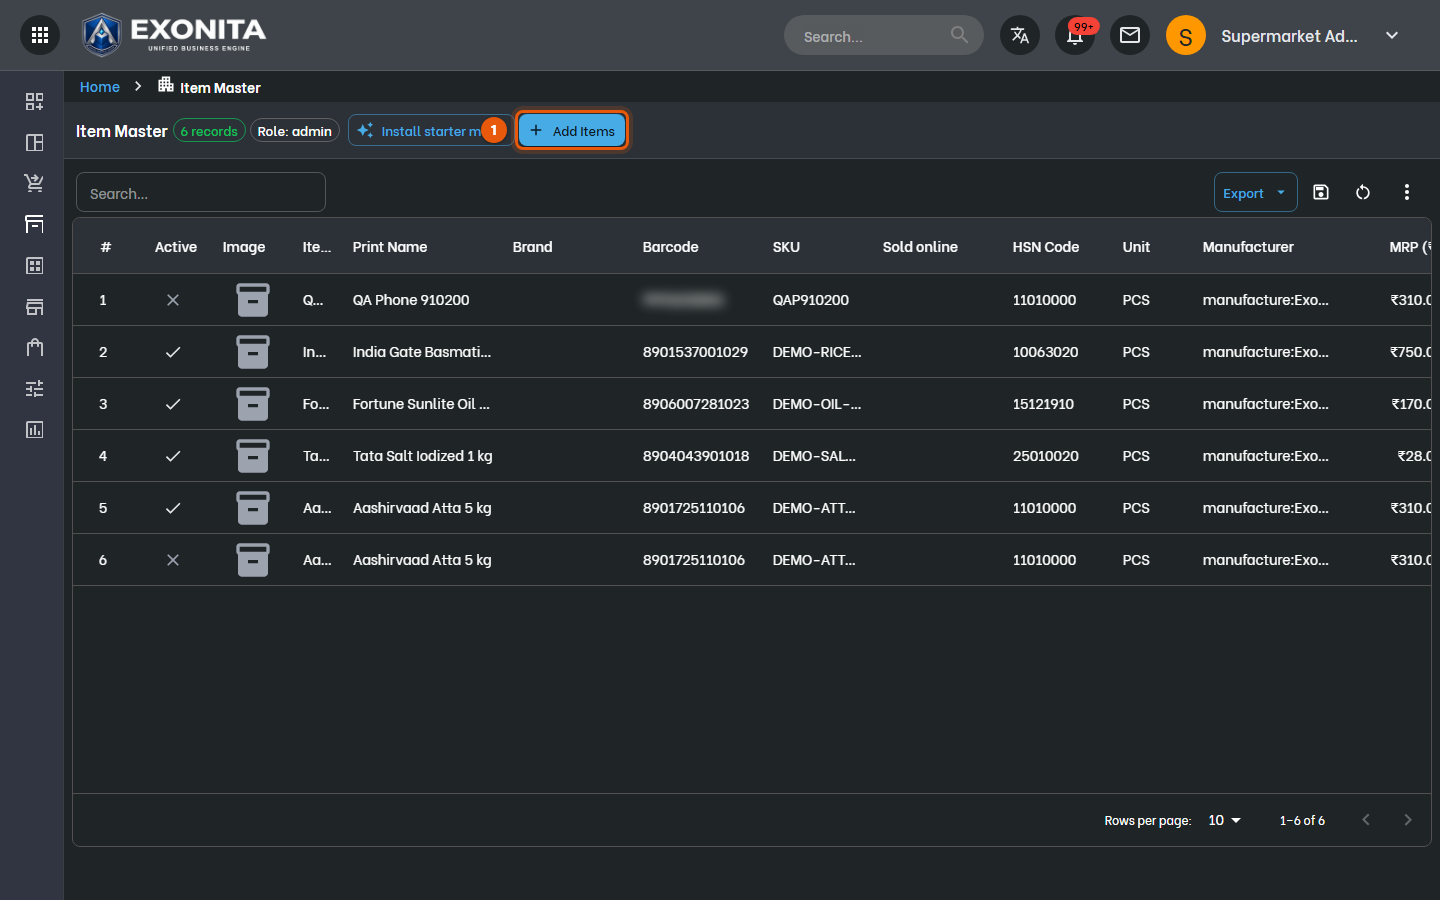
Open Item Master. Your products are listed with their Barcode, SKU, HSN Code, prices and GST %.
You'll see: Select Add Items for one product, or Import to load a spreadsheet of many.
-
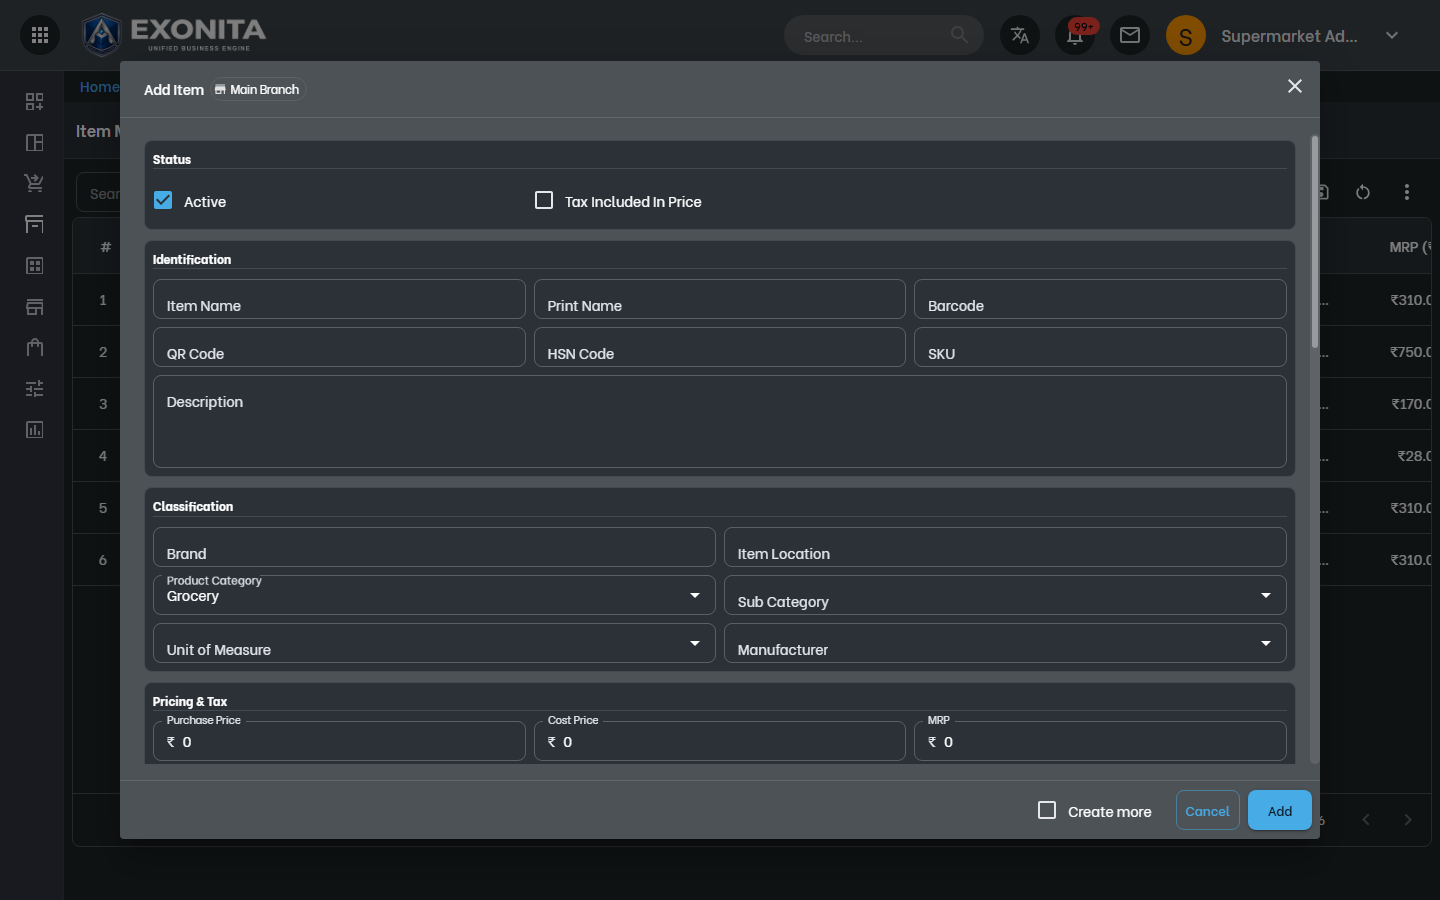
Select Add Items. Enter the product name, category, price and tax, then save.
You'll see: The product appears on the counter and the Quick POS.
-
To add many products at once, open Settings → Import Items. On Item Master, download the template, fill it in and upload it.
You'll see: Every row is checked first. Rows with mistakes are listed with the reason; only valid rows are imported.
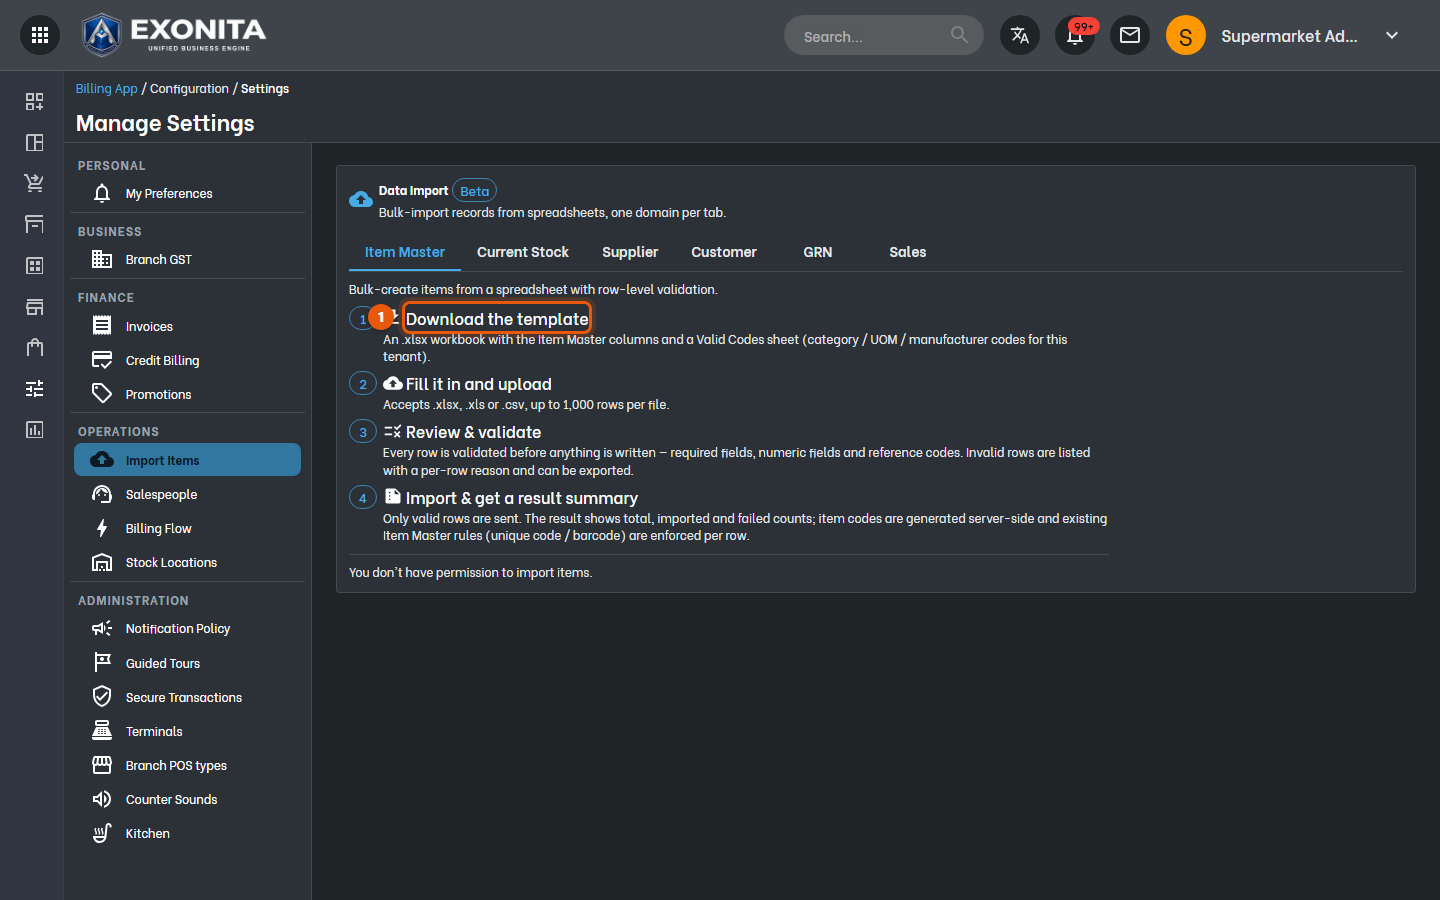
TipUp to 1,000 rows per file, as .xlsx, .xls or .csv. The template's Valid Codes sheet lists your category, unit and tax codes.
Task 9
Print barcodes and shelf labels
Label products that don't come with a barcode, such as loose or repacked items, and print shelf labels.
WhereCatalog Setup → Barcode Printing / Label Printing
-
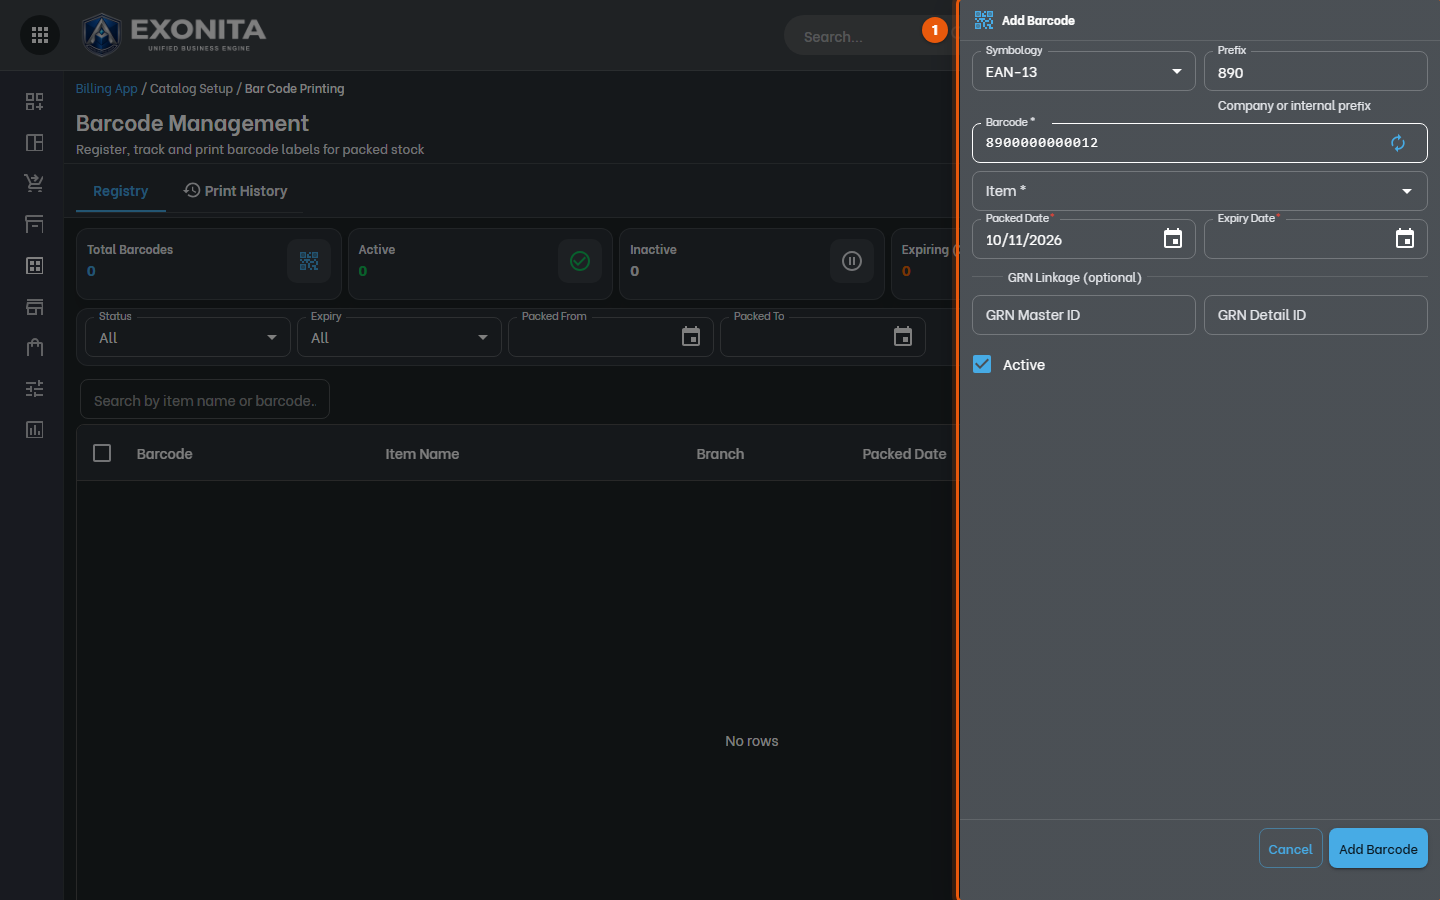
Open Barcode Management and select Add. In Add Barcode, keep EAN-13 and your Prefix, pick the Item, set the Packed Date and Expiry Date, and select Add Barcode. Use it for products you pack yourself, such as rice repacked into 1 kg bags.
You'll see: The barcode is listed with its dates and status (Expiring and Expired are counted at the top). Print it and stick it on the packs; the counter scans it like any other barcode.
-
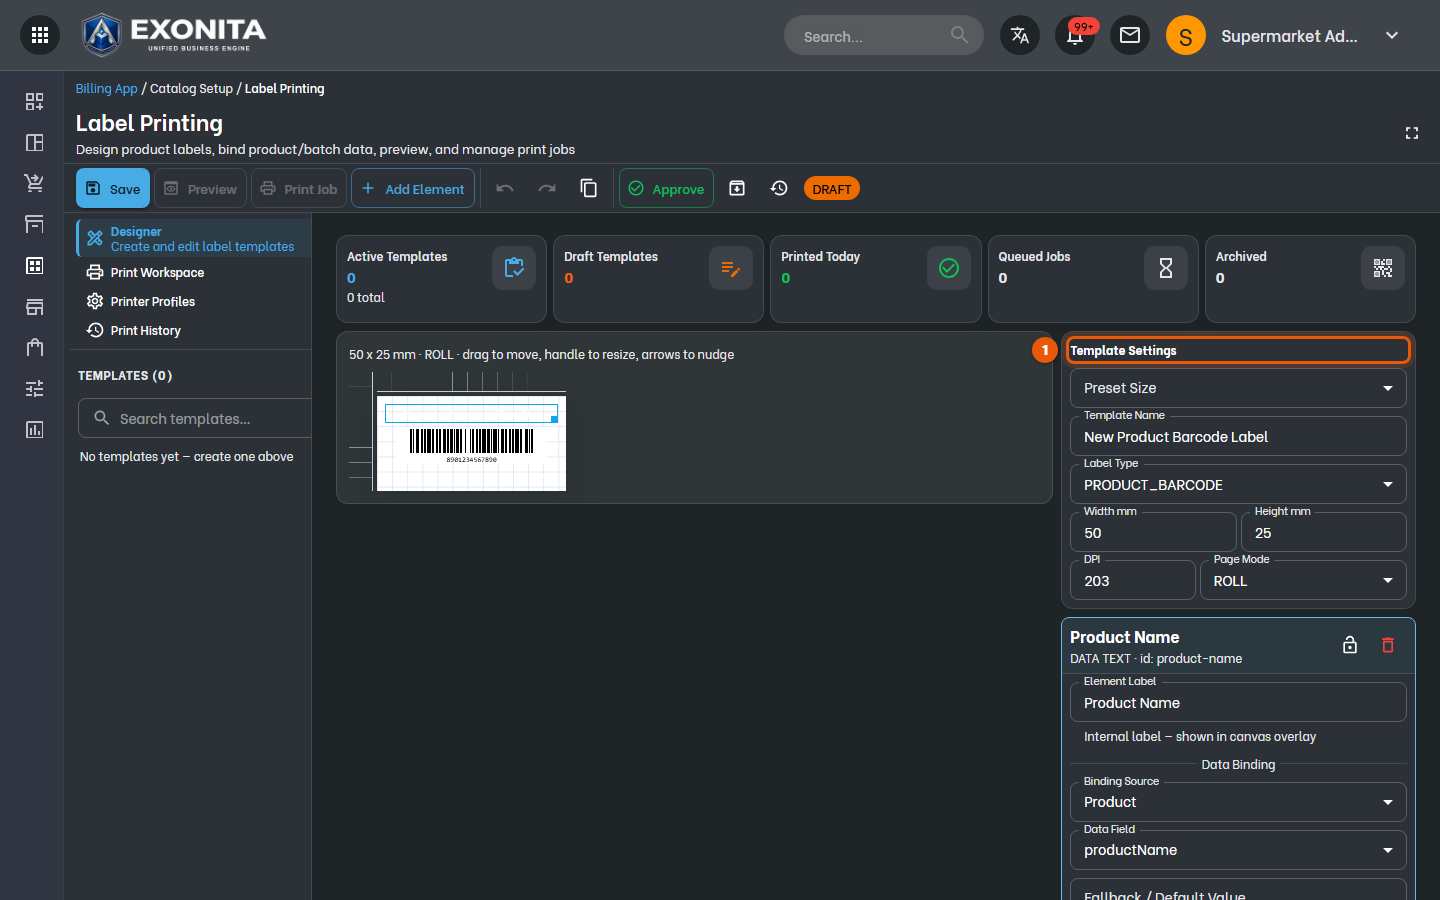
Open Label Printing to design a label: choose a Preset Size, give it a Template Name, and drag the name, barcode, price and unit where you want them.
You'll see: Save the template, then print labels for any product on your label printer.
Task 10
Check the invoice layout
Make sure the printed bill looks right.
WhereSettings → Invoices, and Common App → Print Management
-
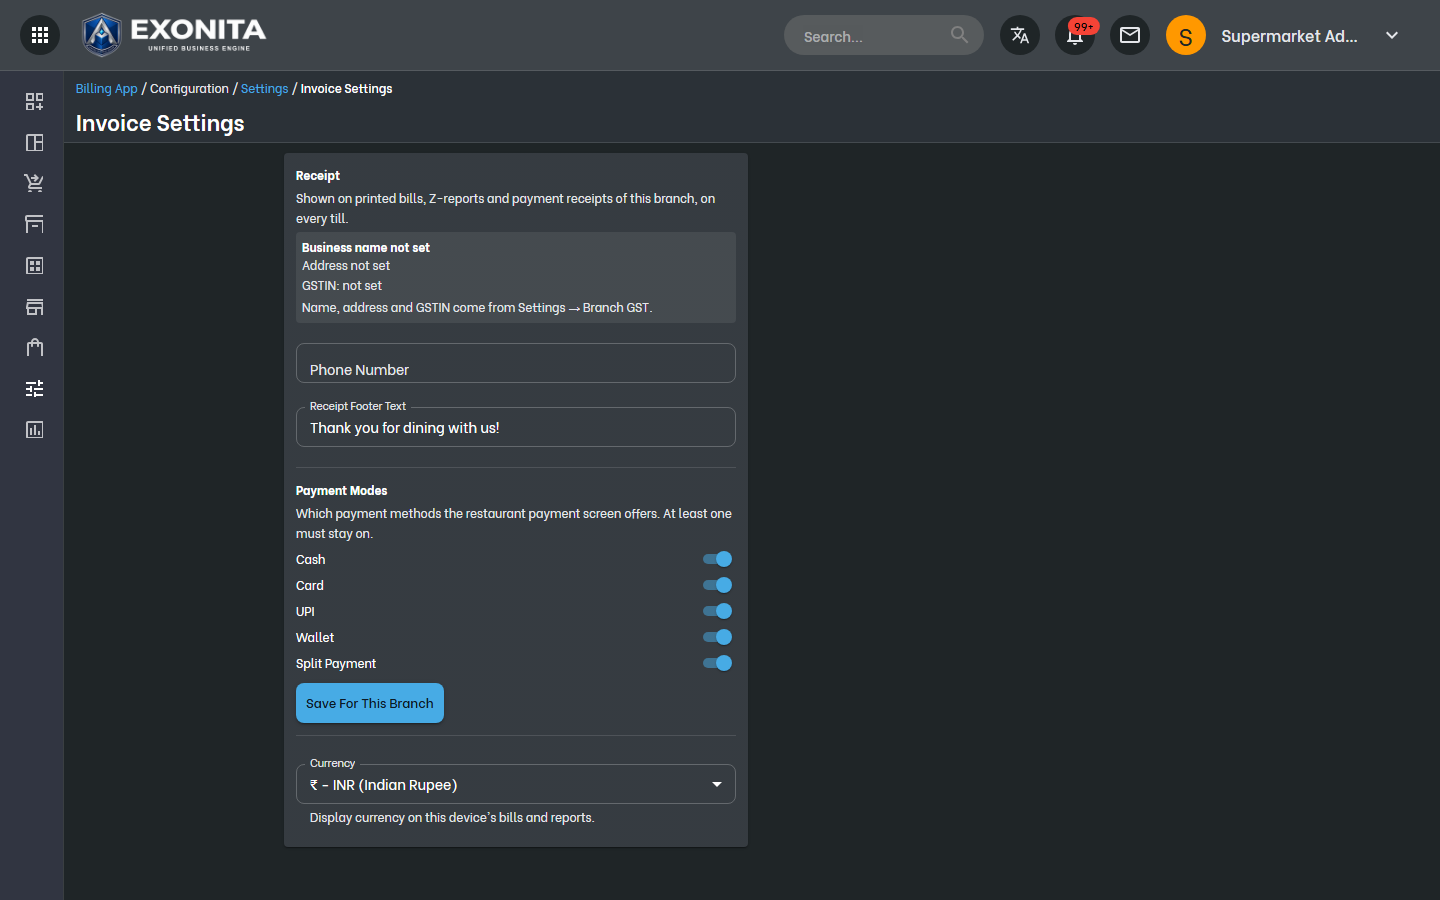
Open Invoice Settings and check the preview of your bill: business name, GST number and address. Set the Phone Number and the Receipt Footer Text printed at the bottom.
You'll see: Bills at this branch print with this layout, on every counter.
-
To print your logo, open Common App → Print Management. Under Branding, select Upload Image for the Print Logo, crop it and select Save Changes.
You'll see: Invoices and receipts print with your logo.
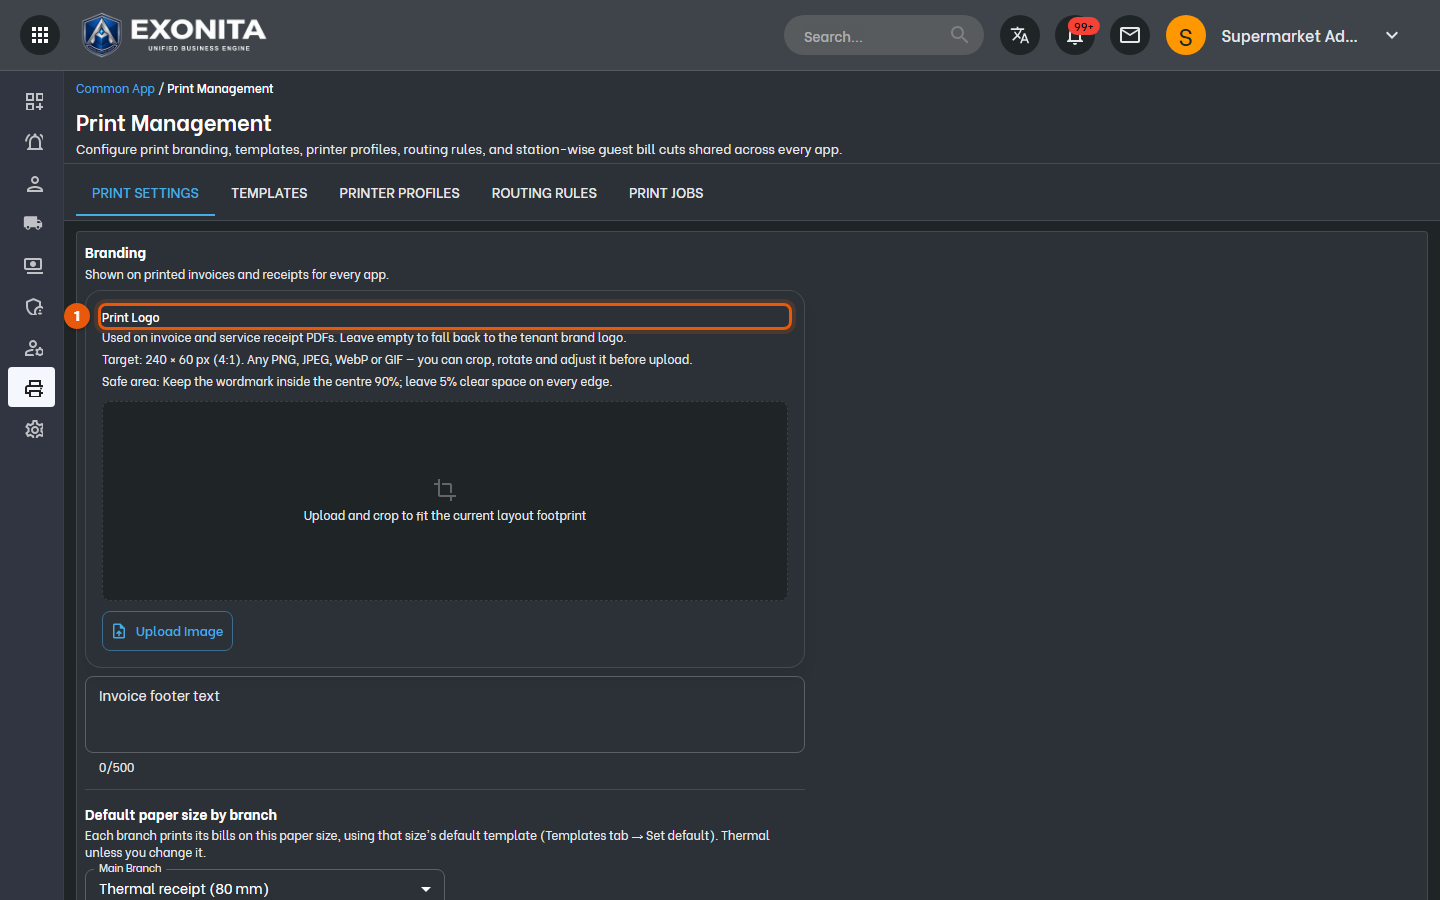
TipUse a wide logo, about 240 × 60 pixels.
Task 11
Choose how the counter bills
Decide how many steps a bill takes, whether you bill on credit, and which offers apply on their own.
WhereSettings → Billing Flow / Credit Billing / Promotions
-
Select Billing Flow. Turn on Quick pay to post cash bills with one click on Checkout, and choose whether the receipt prints automatically. Choose whether the counter reads label-scale barcodes for weighed items.
You'll see: The counter at this branch bills the way you chose.
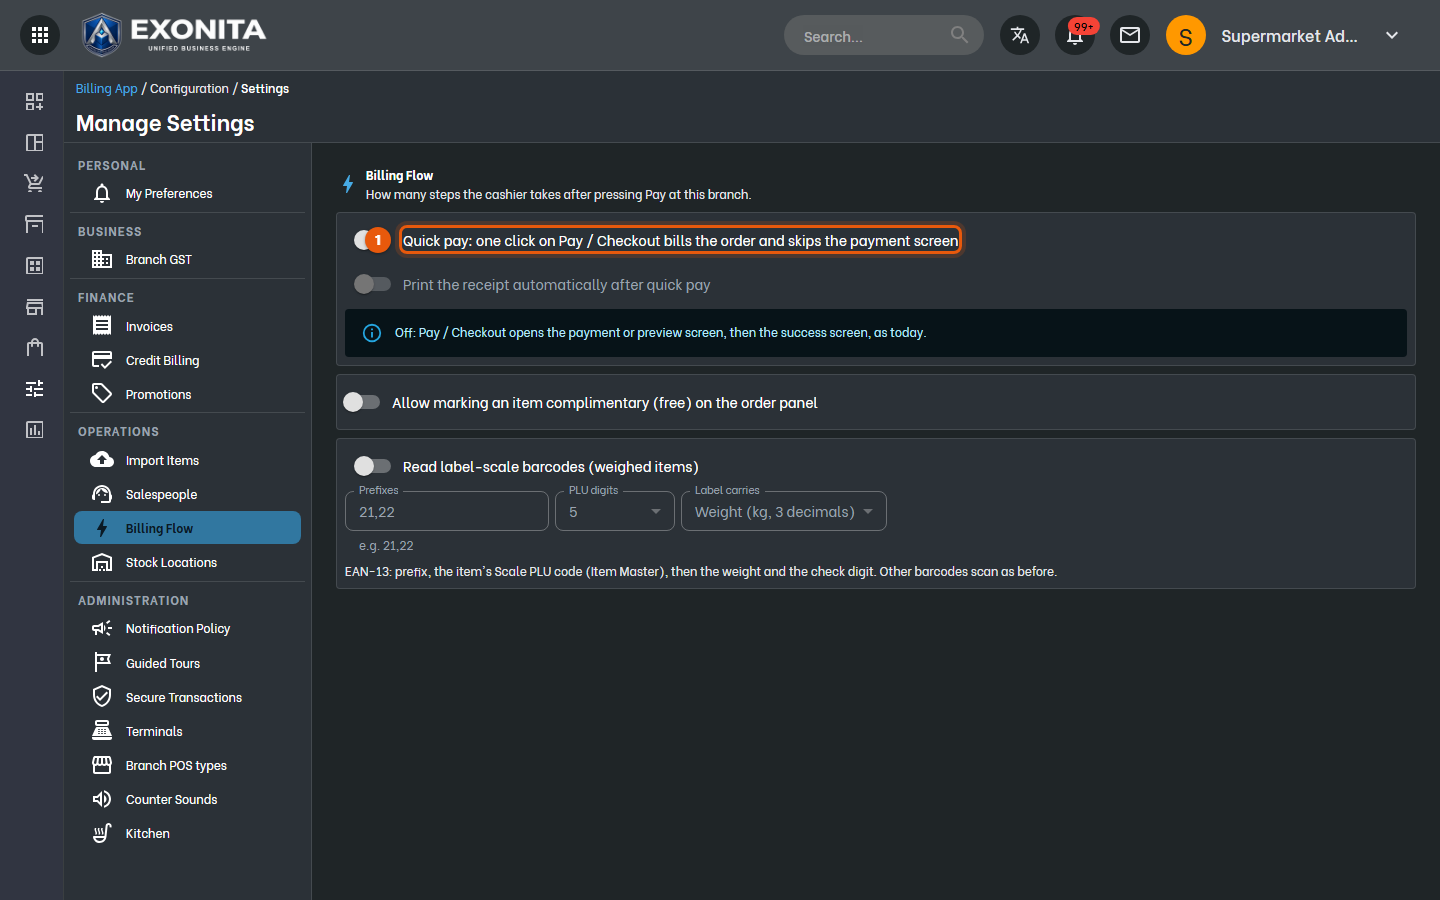
TipWith quick pay on, credit bills still show the preview. Cashiers can still choose another mode from the ▾ next to Checkout, or with Shift+F4.
-
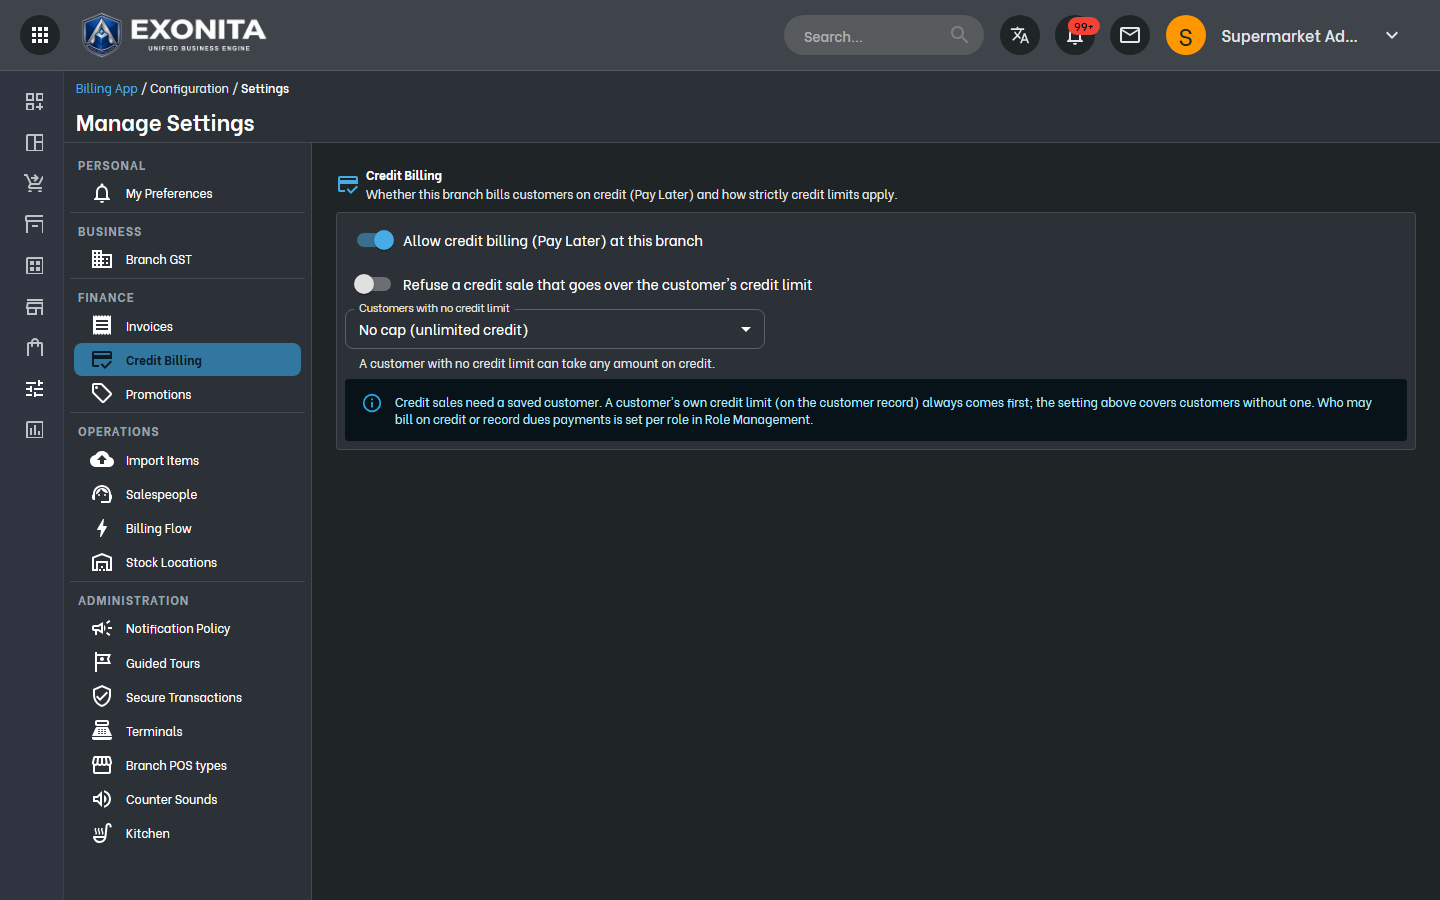
Select Credit Billing. Turn on Allow credit billing (Pay Later) at this branch if regular customers may pay later, and choose what happens for customers with no credit limit.
You'll see: Cashiers can bill a saved customer on credit, up to their limit.
-
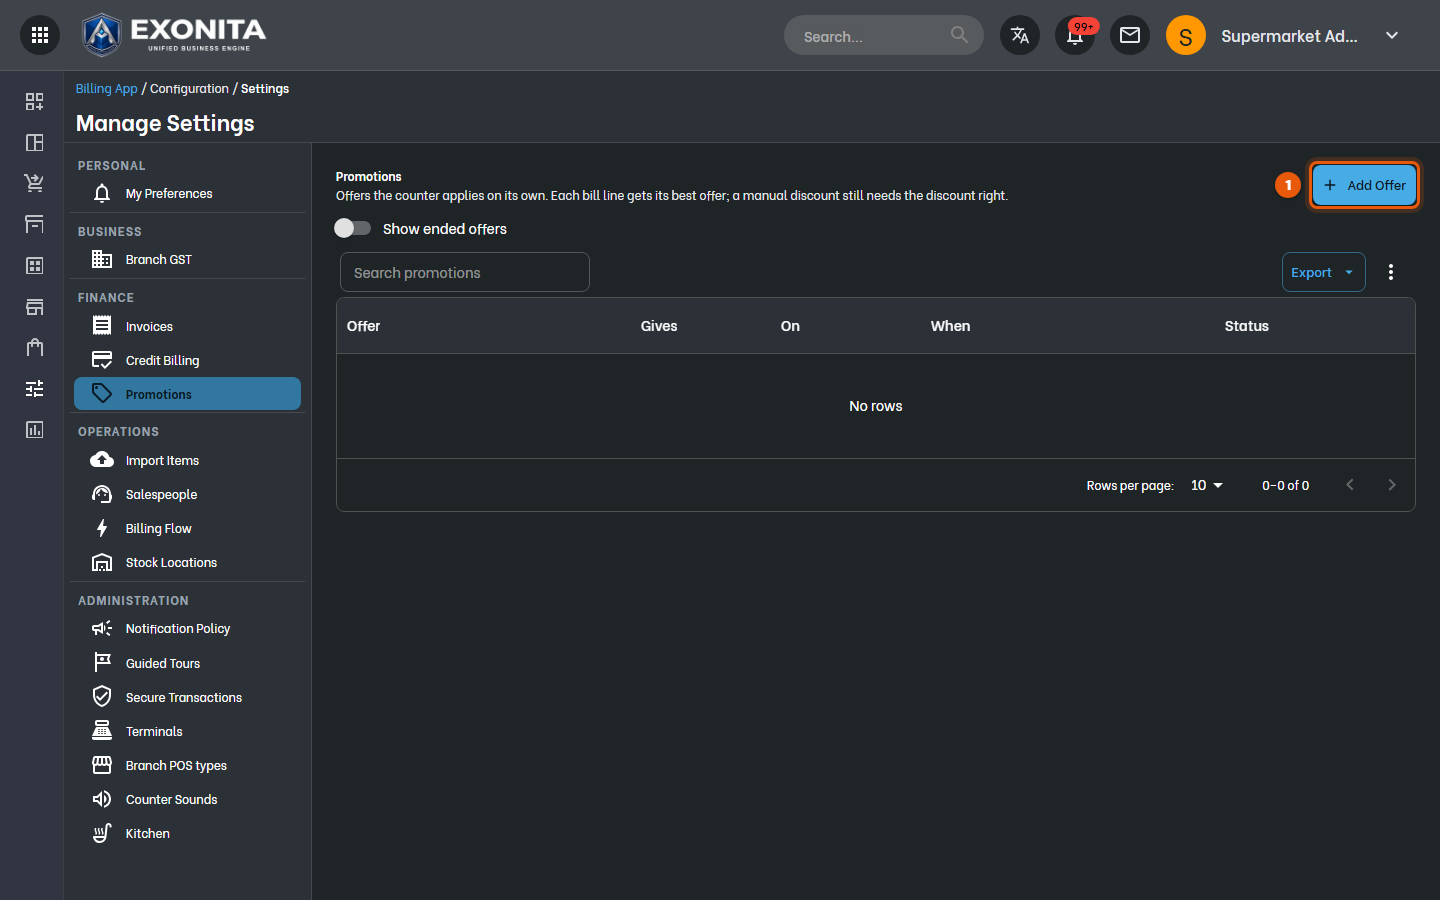
Select Promotions, then Add Offer to set up a scheme, such as buy two, get one free on a product, or a percentage off a category.
You'll see: The counter applies the best offer to each bill line on its own. A manual discount still needs the discount right.
-
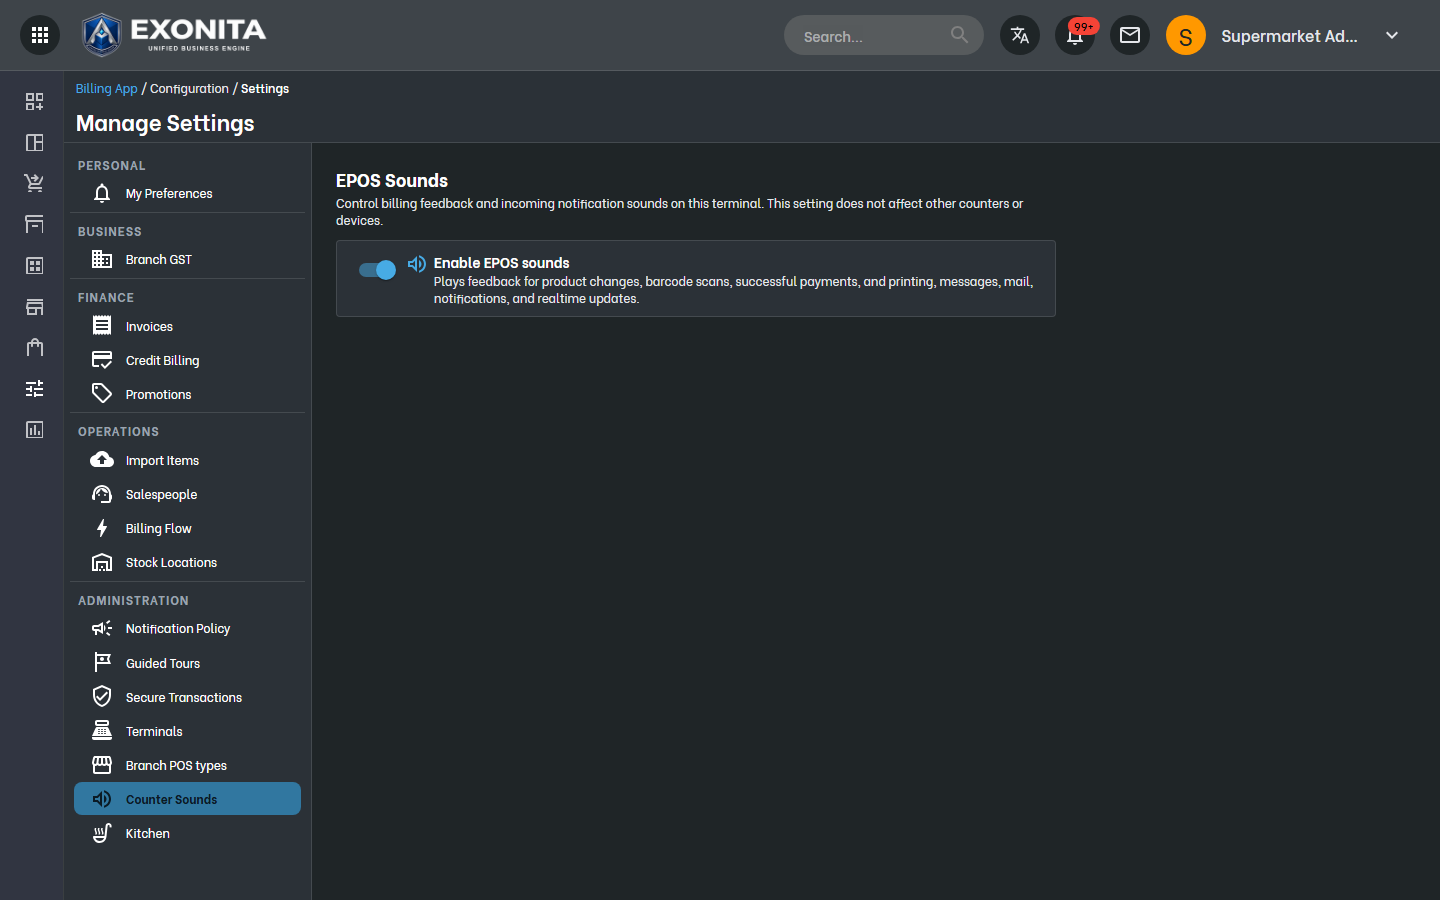
Select Counter Sounds to switch the counter's sounds for scans, payments and new orders on or off.
You'll see: This applies to this computer only.
Task 12
Add your staff and choose what they can do
Give each cashier their own login, and decide which screens and actions each role gets.
WhereCommon App → User Manager / Role Setup
-
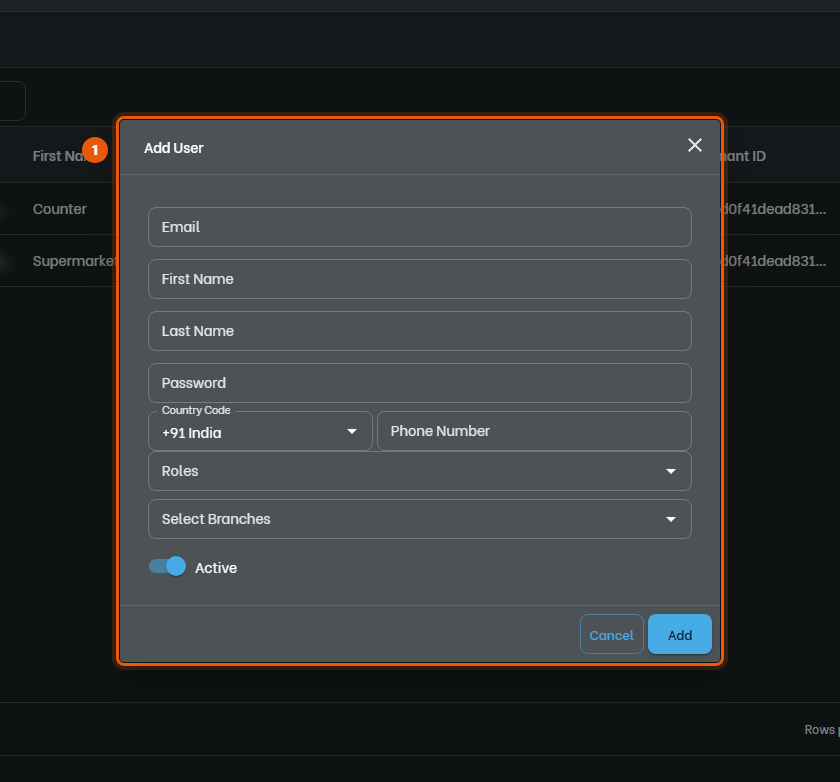
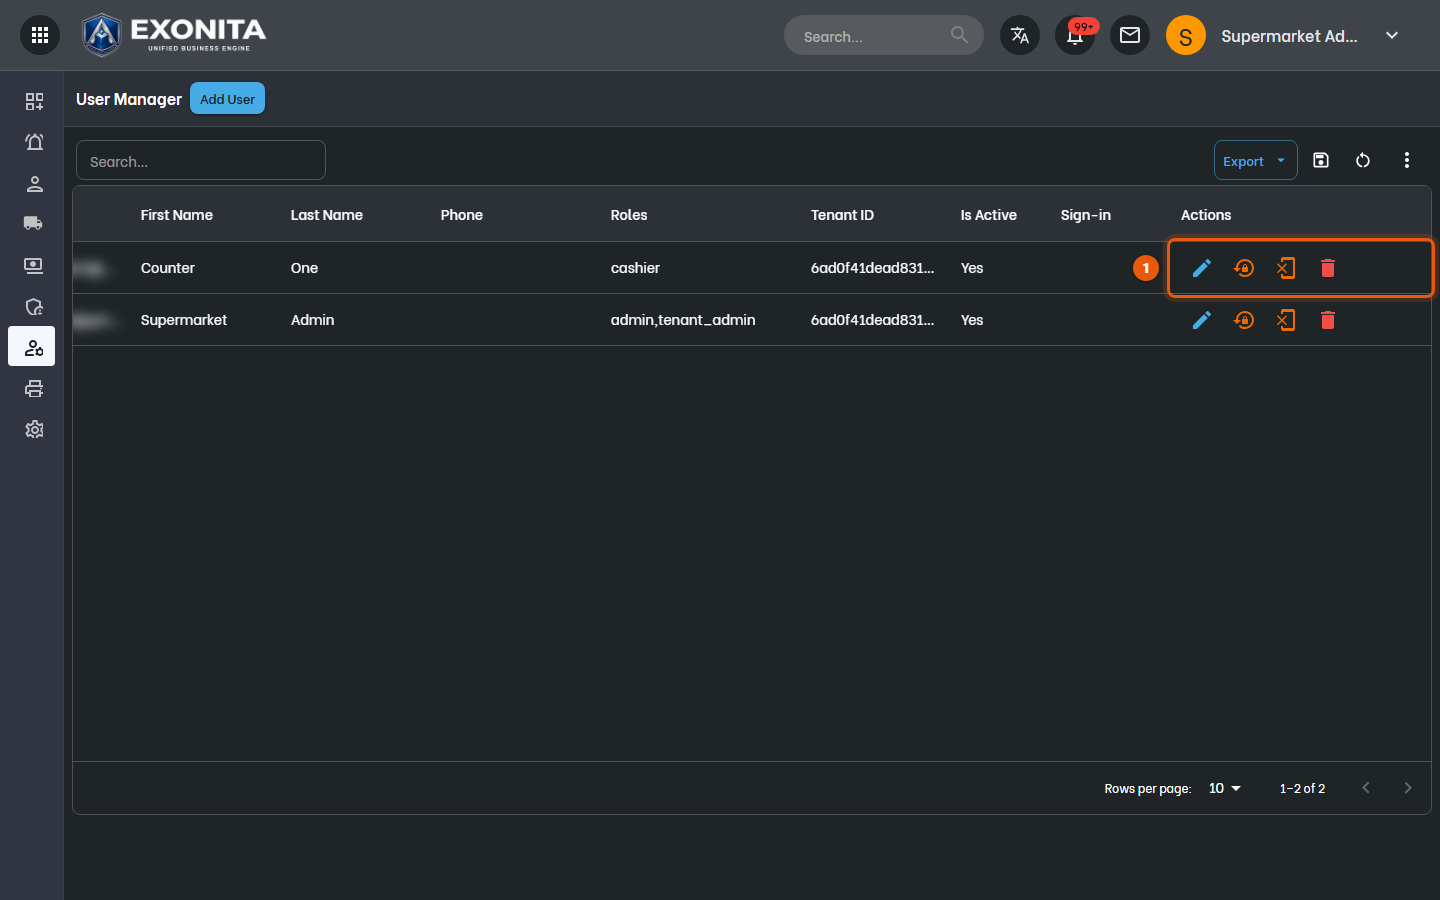
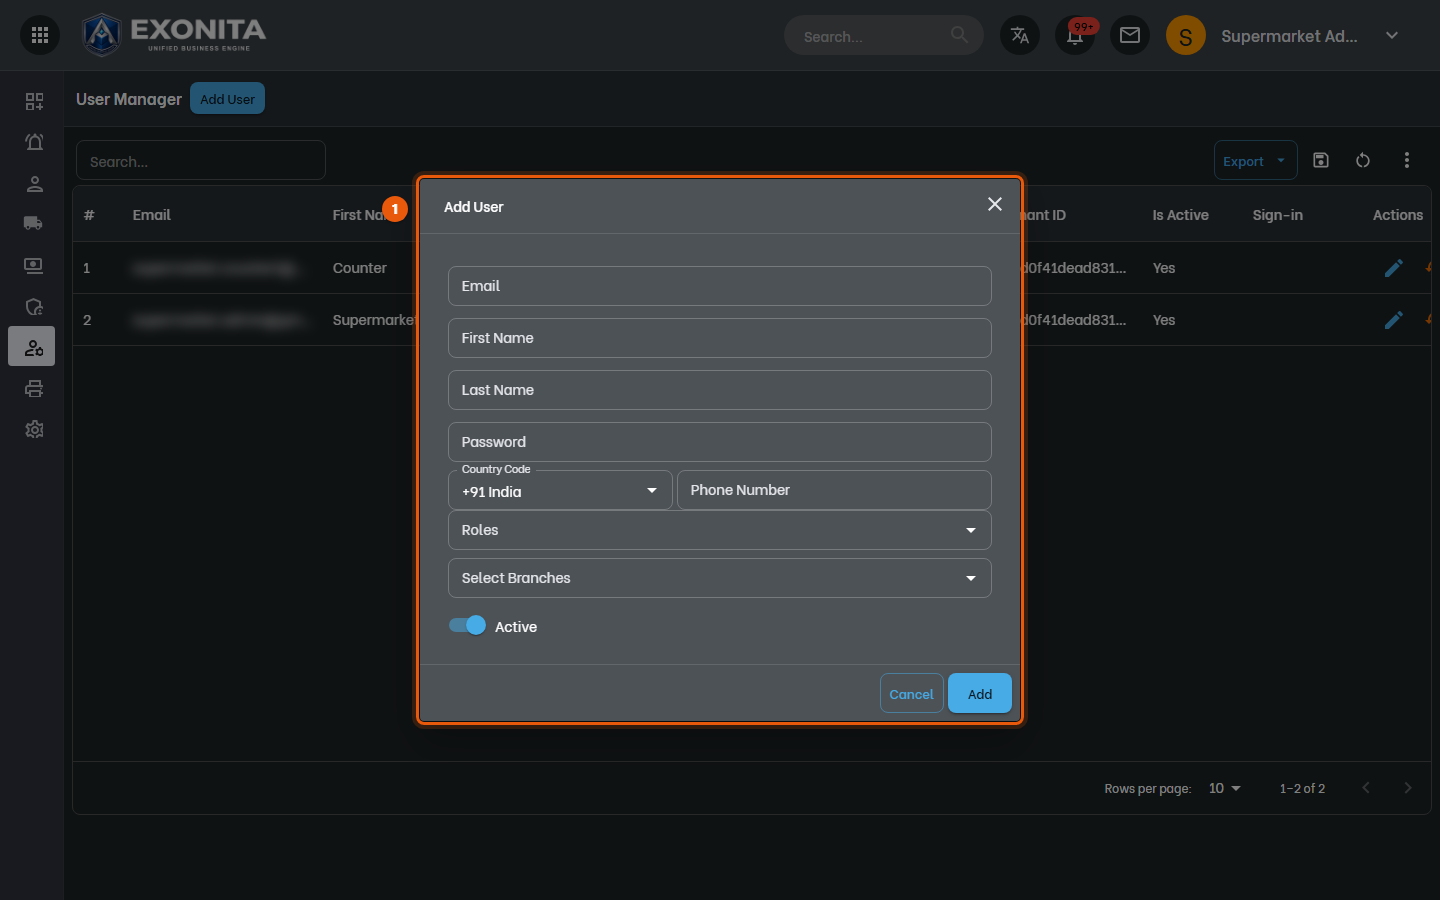
Open Common App → User Manager and select Add User. Enter the person's email, name, password and phone, choose their Roles (such as Cashier) and the branches they work at, then select Add.
You'll see: They can sign in with their email and password.
TipGive everyone their own login. Every bill is recorded under the name of the person who signed in.
-
To help someone who can't sign in, use the icons under Actions at the end of their row: the pencil to edit them, Reset Password, and Reset two-step verification (for a lost phone). A user who is locked out after too many wrong passwords also gets an unlock icon there.
You'll see: They can sign in again. Resetting two-step verification makes them set it up again at their next sign-in.
-
Open Role Setup, choose a role such as Cashier, and switch permissions on or off.
You'll see: The change applies the next time those users open a screen.
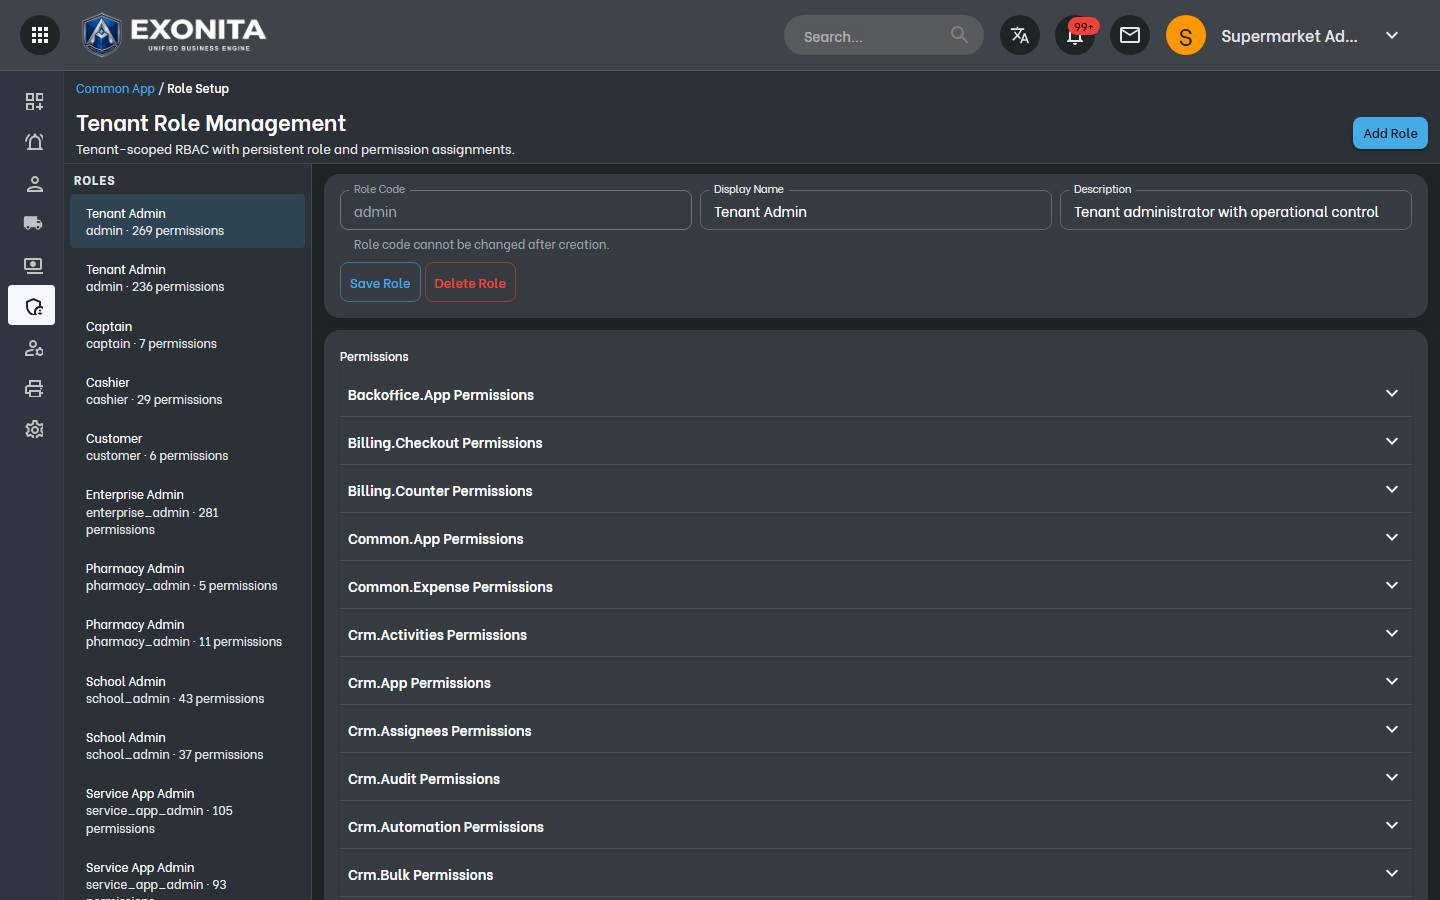
TipCashiers can't give discounts or change prices by default. Turn on those permissions only for people you trust with them.
Task 13
Decide how staff sign in
Choose who must use two-step verification, and which admin actions ask for a code.
WhereCommon App → Settings → Session Security
-
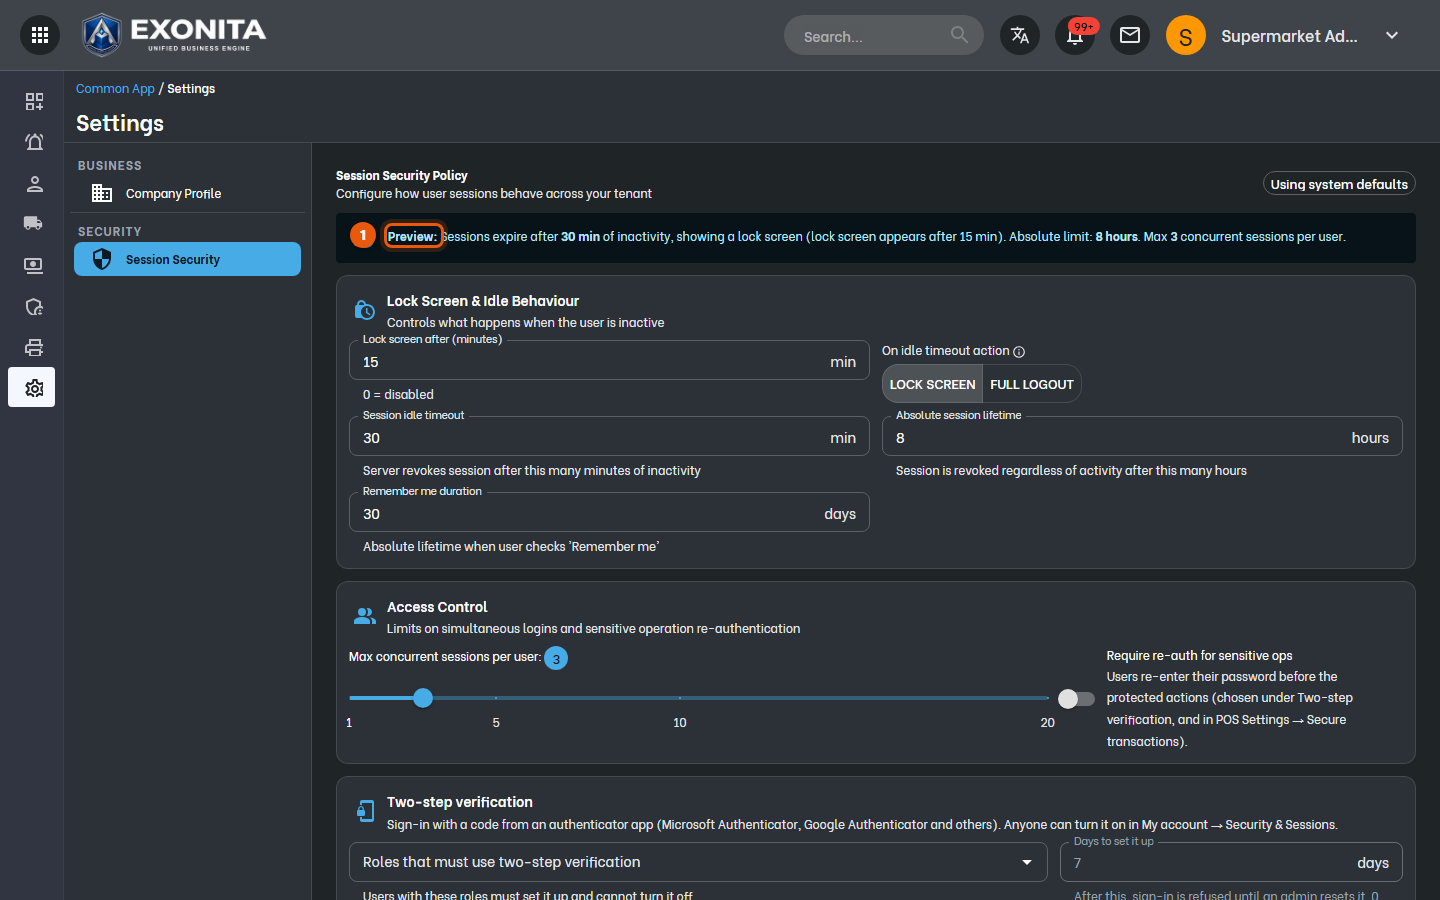
Open Common App → Settings → Session Security. At the top, choose how long a session can stay idle and what happens then: Lock screen or Full logout.
You'll see: Preview sums up the policy in one sentence.
-
Scroll to Two-step verification. In Roles that must use two-step verification, add the roles that need it, such as administrators. Set Days to set it up:
0makes them set it up at their next sign-in.You'll see: Users with those roles are asked to set up two-step verification after they sign in, and can't turn it off.
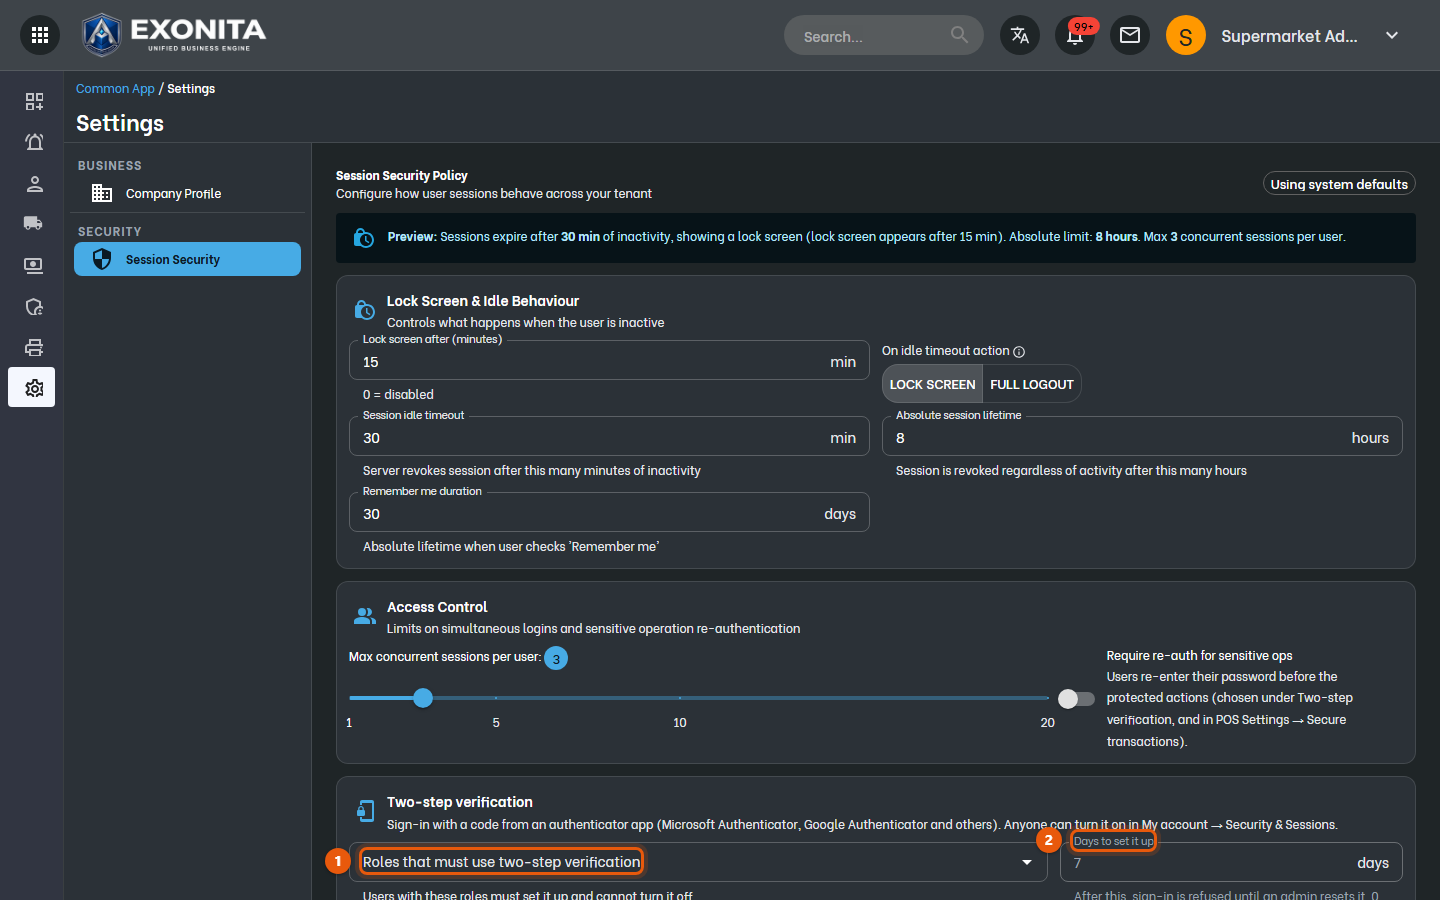
ImportantAfter the deadline, sign-in is refused until an administrator resets that person's two-step verification.
-
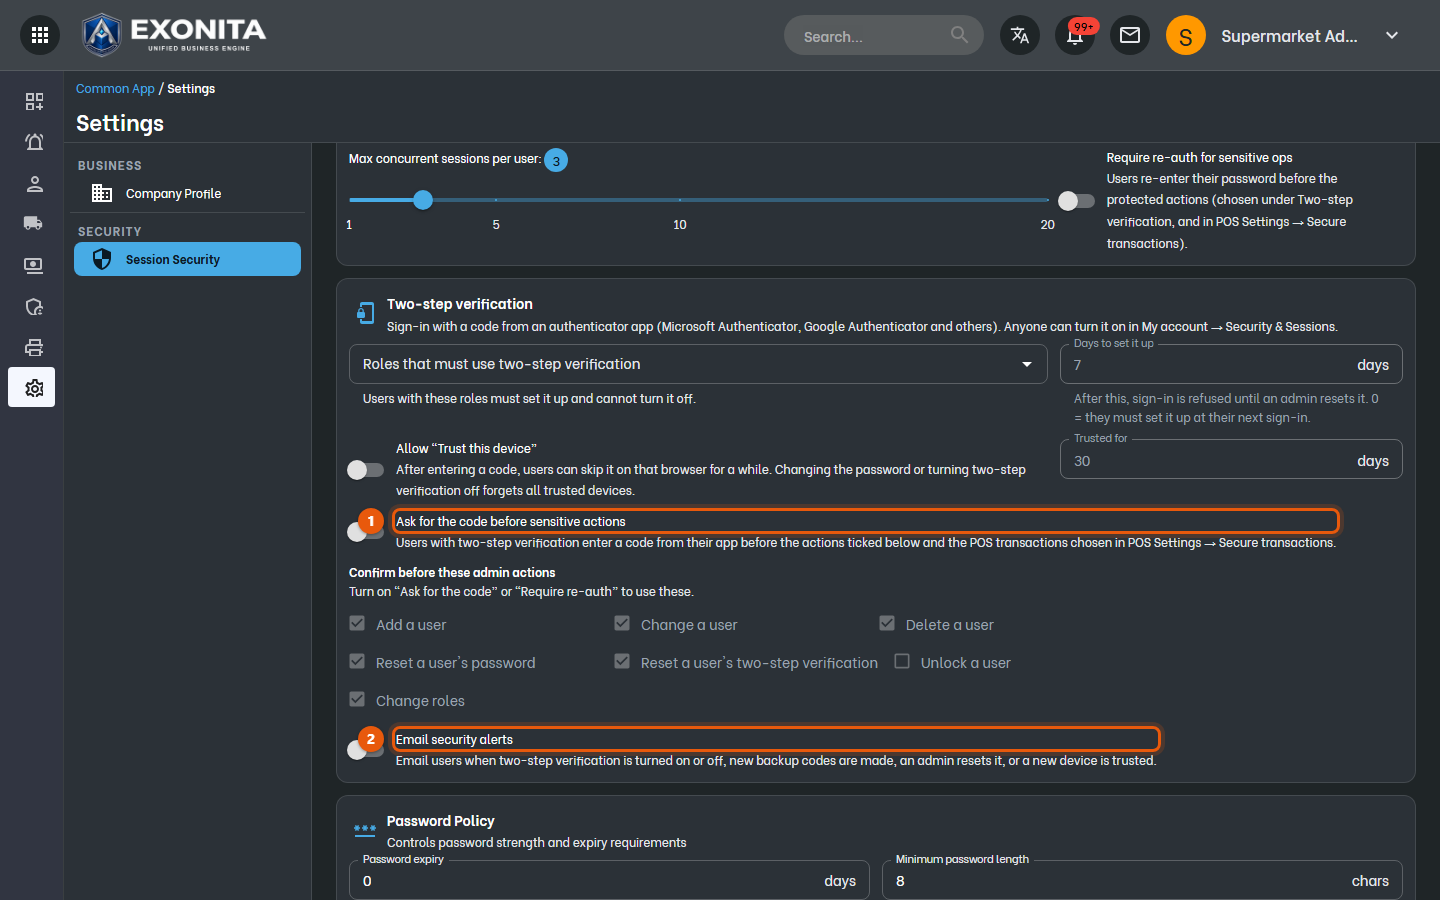
Below that, choose whether to Allow “Trust this device” and for how many days, Ask for the code before sensitive actions, and Email security alerts. Under Confirm before these admin actions, tick the actions that ask: adding, changing or deleting a user, resetting a password or two-step verification, unlocking a user, and changing roles. Then select Save Security Policy.
You'll see: Changing this policy always asks for confirmation.
-
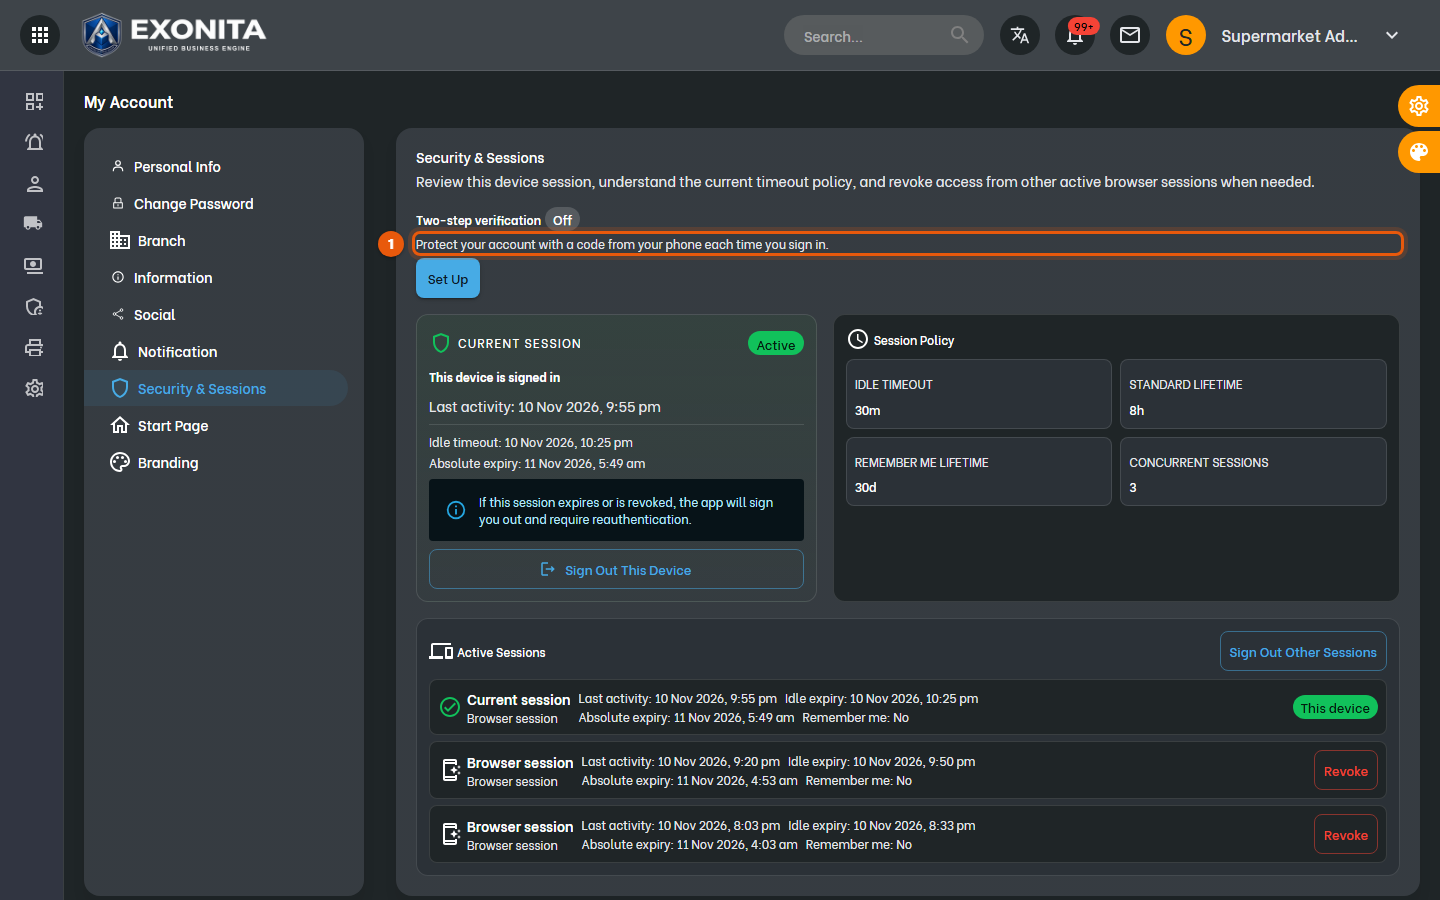
Turn on two-step verification for yourself first: open your name at the top right → My account → Security & Sessions, and select Set Up next to Two-step verification.
You'll see: The set-up shows a QR code to scan with Microsoft Authenticator or Google Authenticator.
TipThe Sign-in security guide shows every set-up step, including the backup codes.
Task 14
Choose which transactions ask staff to confirm
Ask the person at the counter to confirm it's them before money-changing actions such as cancelling a bill.
WhereSettings → Administration → Secure Transactions
-
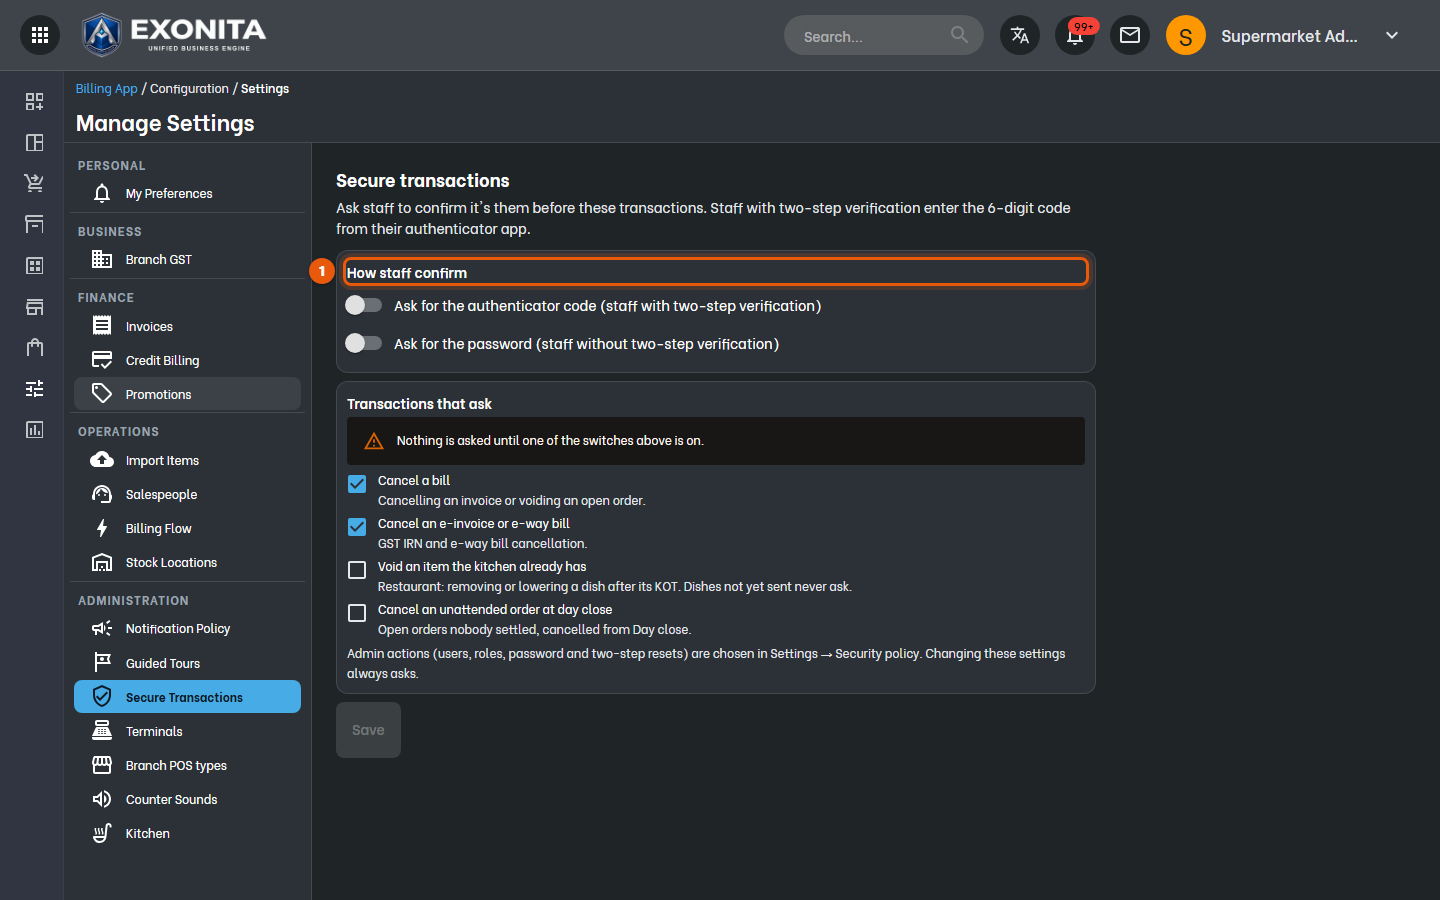
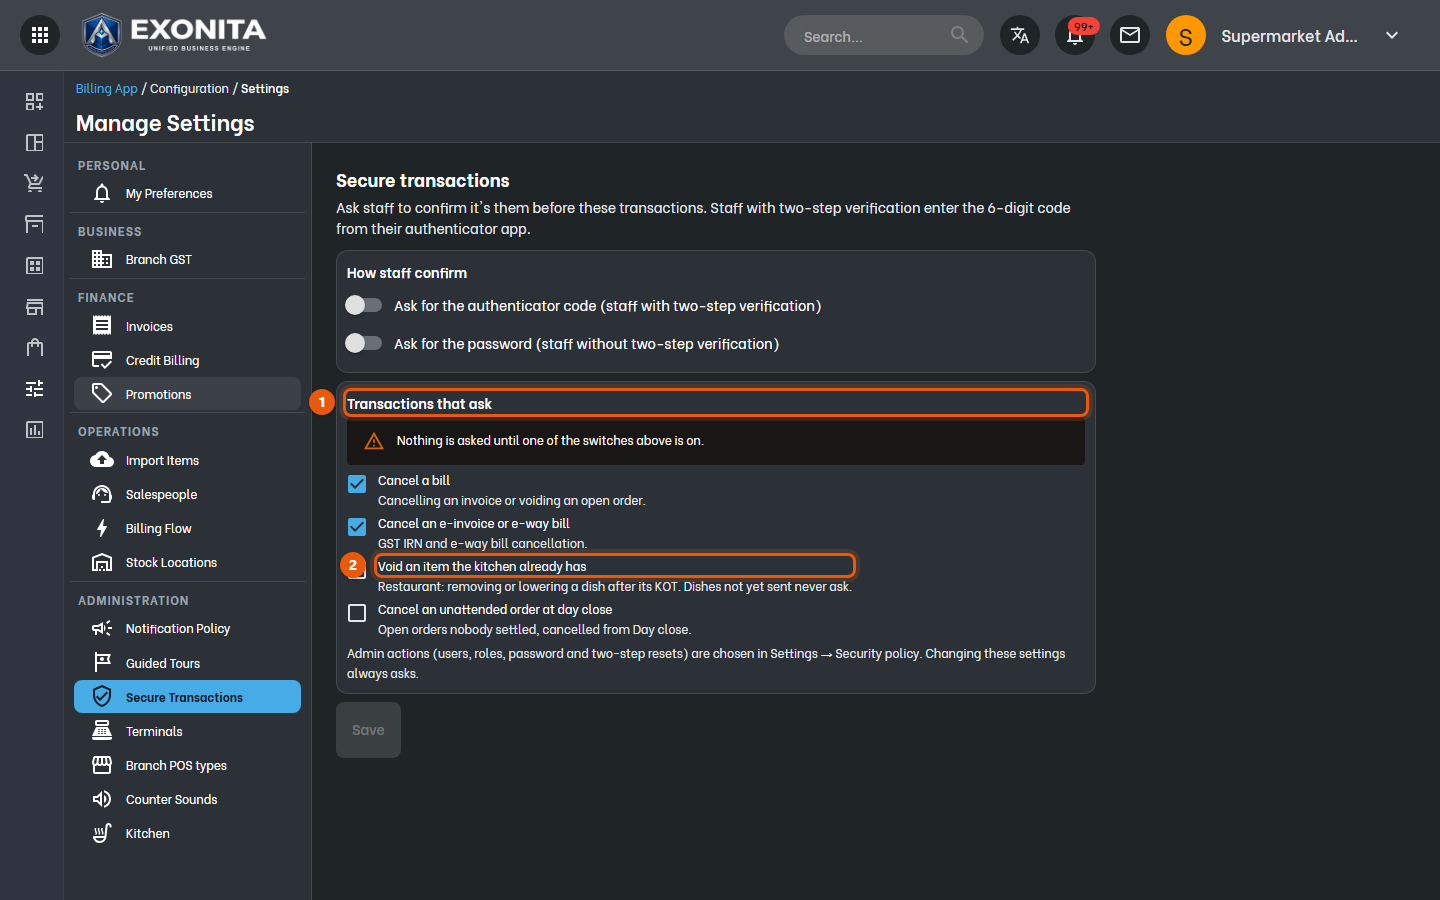
Open Settings → Secure Transactions. Under How staff confirm, turn on Ask for the authenticator code (staff with two-step verification) and Ask for the password (staff without it).
You'll see: Nothing is asked until one of these switches is on.
-
Under Transactions that ask, turn on the ones to protect: Cancel a bill, Cancel an e-invoice or e-way bill, Void an item the kitchen already has and Cancel an unattended order at day close, then save.
You'll see: Before those actions, staff see Confirm it's you and enter their code or password. One confirmation covers the same action for about 4 minutes.
Task 15
Set alerts and guided tours for staff
Decide which pop-up alerts staff see and whether new staff get guided tours.
WhereSettings → Notification Policy / Guided Tours
-
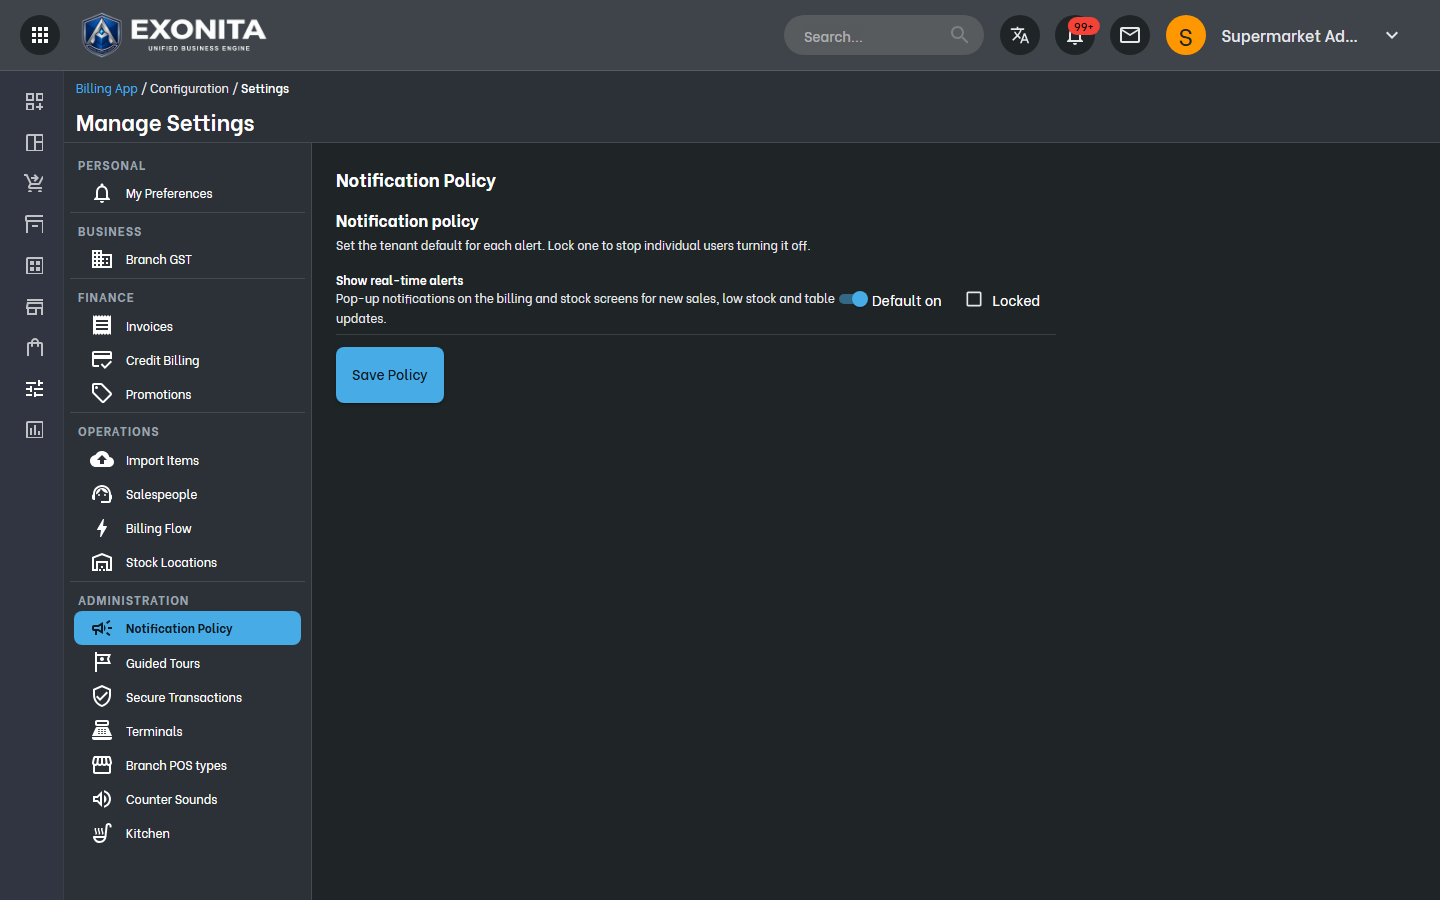
Select Notification Policy. Set the default for each alert, and lock it to stop staff turning it off. Select Save Policy.
You'll see: Staff see real-time alerts for new sales and low stock as you chose.
-
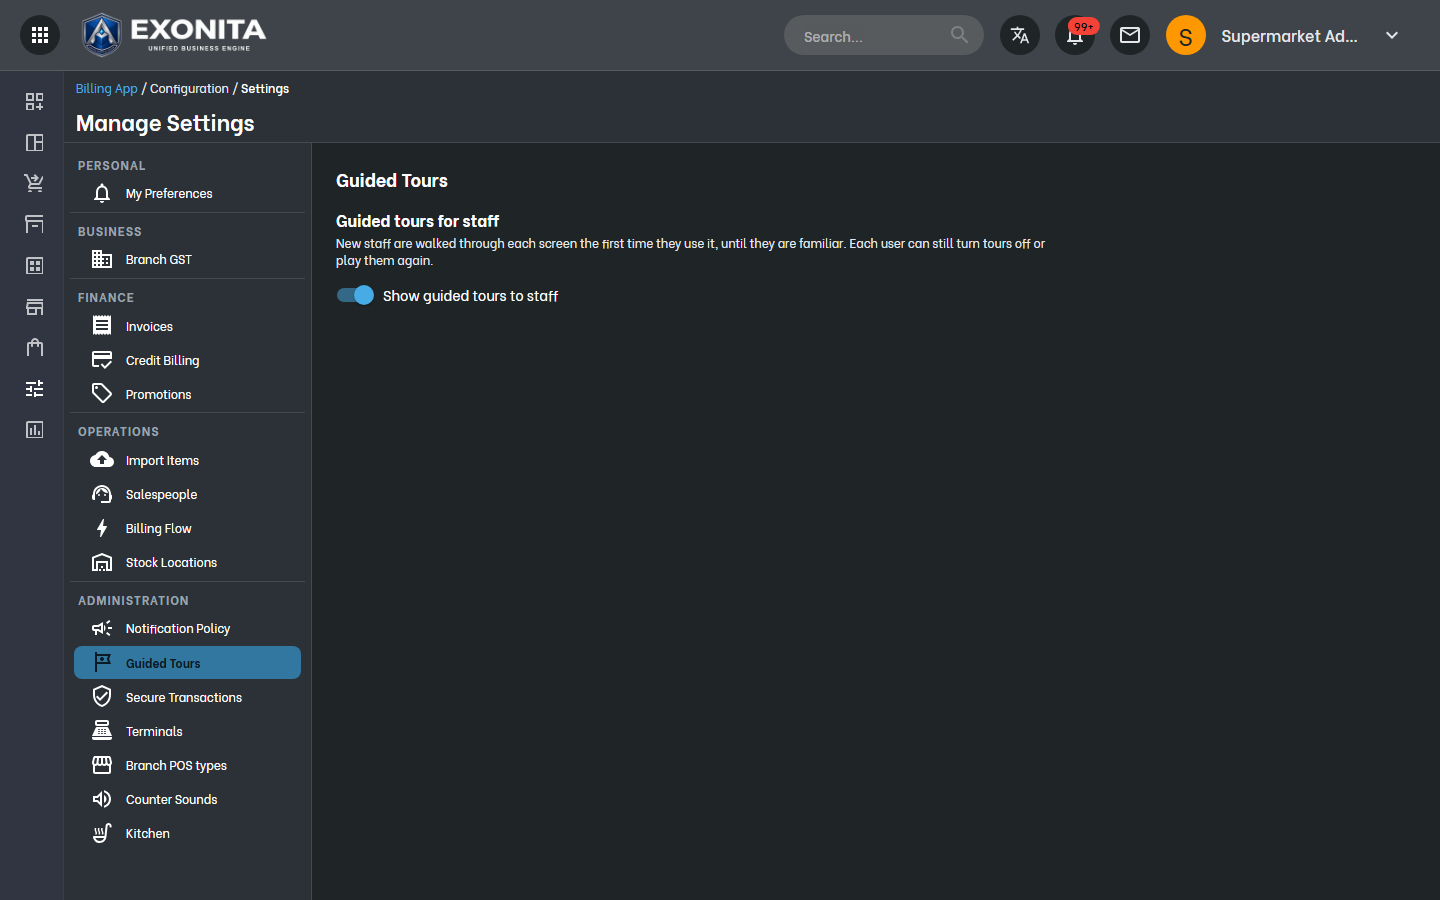
Select Guided Tours and leave Show guided tours to staff on.
You'll see: New staff are walked through each screen the first time they use it.
Task 16
Receive and count stock
Record what you buy, see what's left and know when to reorder.
WhereInventory → Kitchen stock / GRN List / Current Stock / Stock Movement Ledger
-
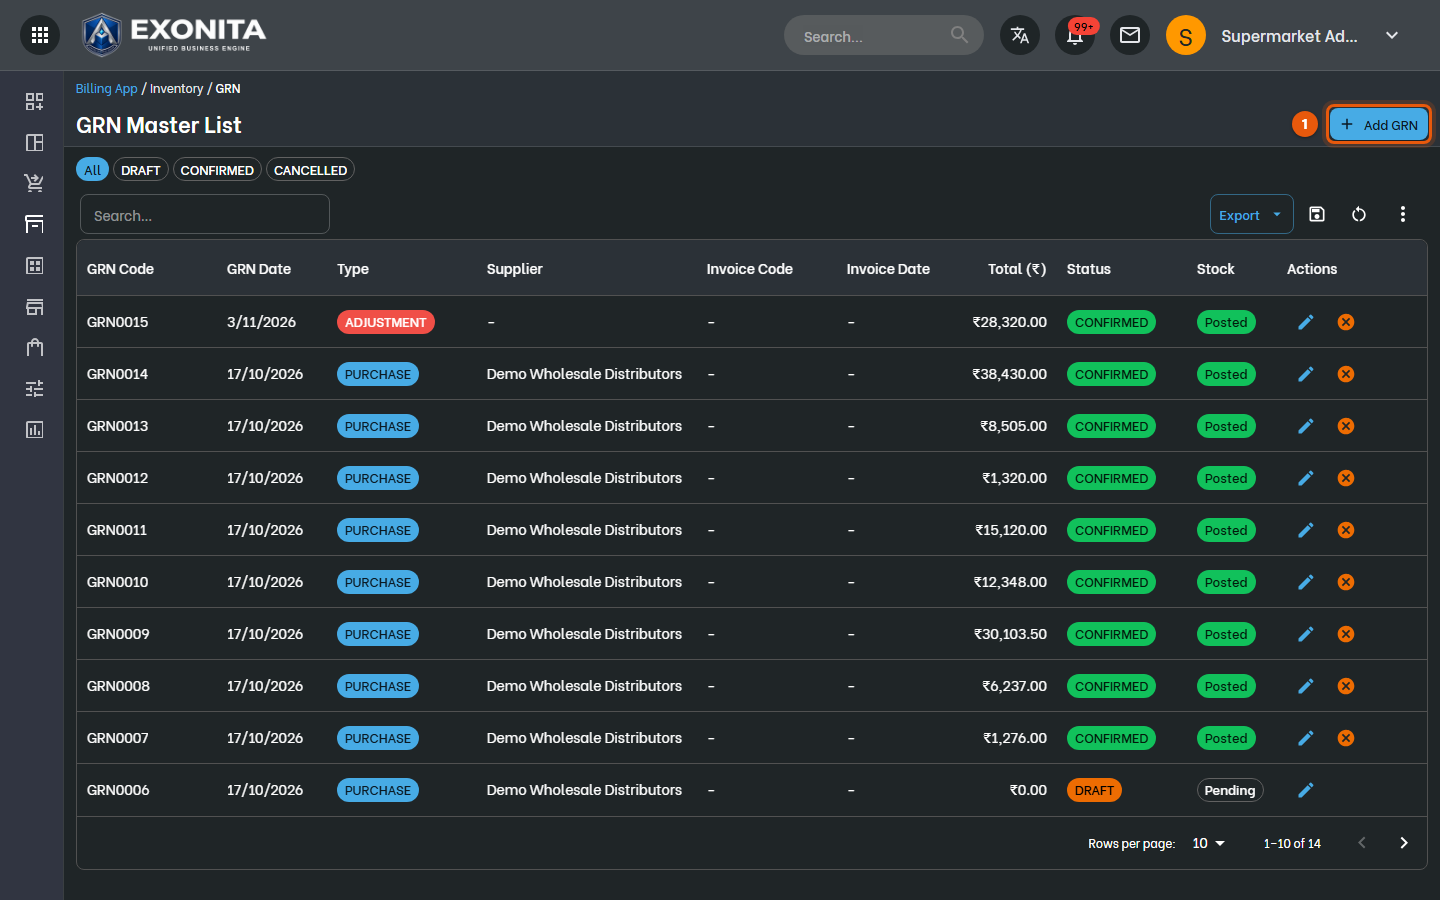
When stock arrives, open GRN List and select Add GRN. Enter the supplier, their invoice number and the items received.
You'll see: Confirming the GRN adds the items to stock.
-
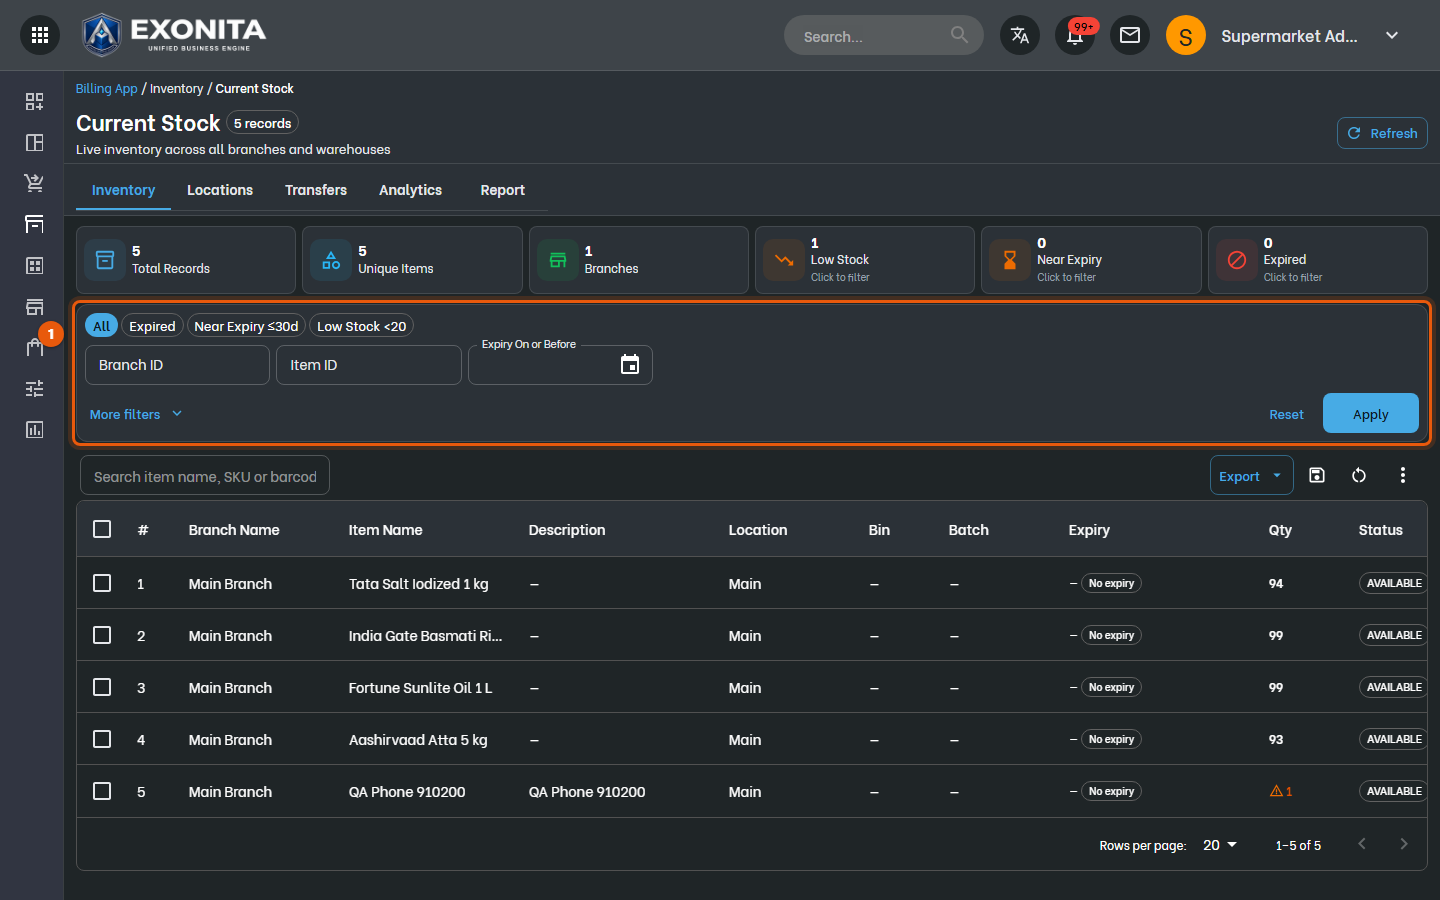
Open Current Stock to see the quantity and value of every item.
You'll see: Filter by category or location, and export the list.
-
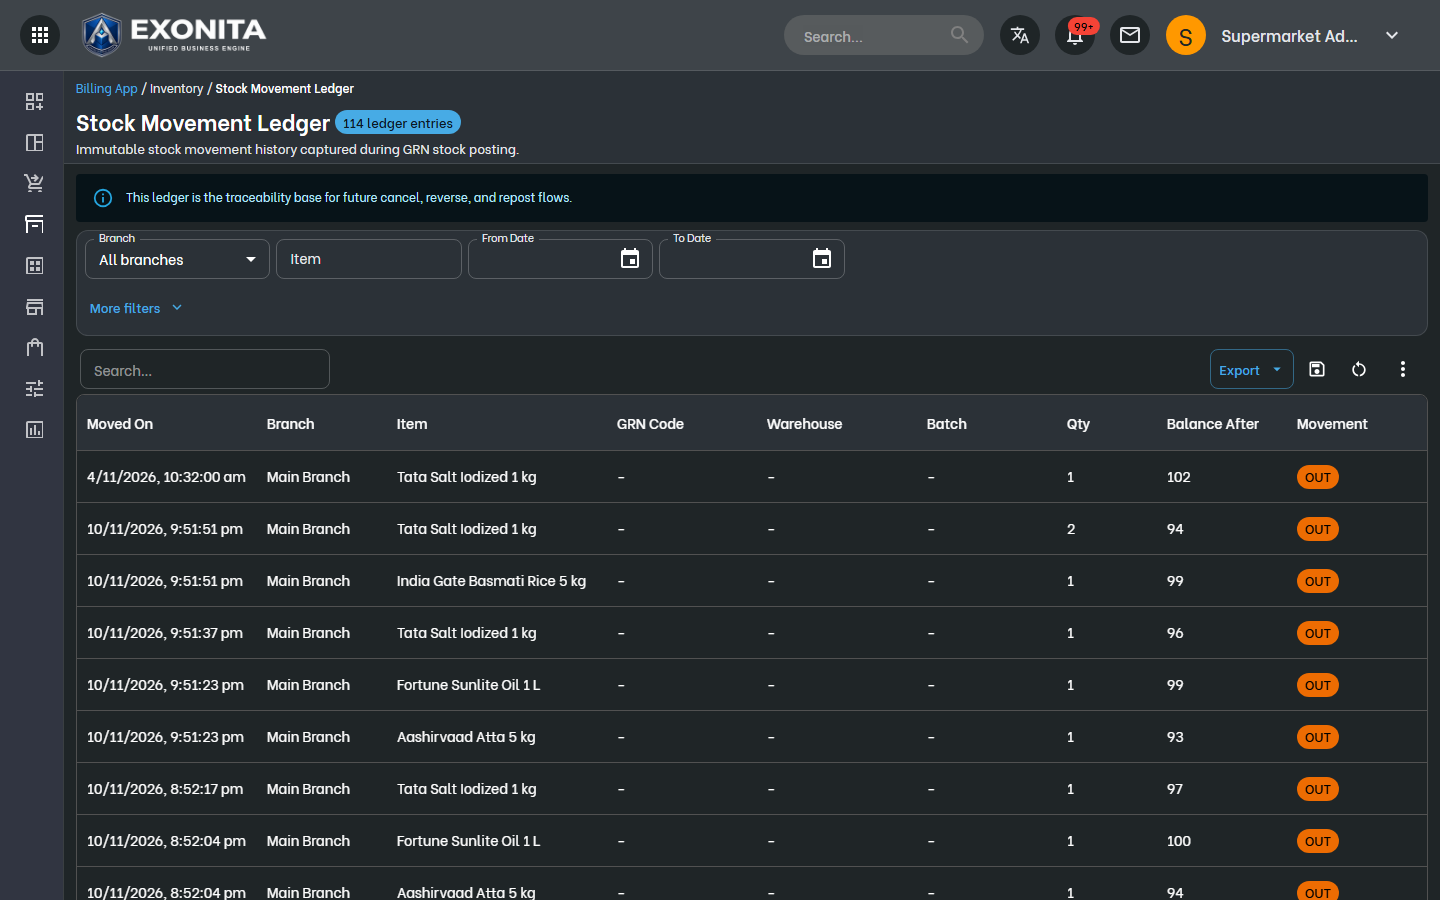
Open Stock Movement Ledger to see every movement of an item: received, sold, moved or counted.
You'll see: Use it to find out why a stock figure changed.
-
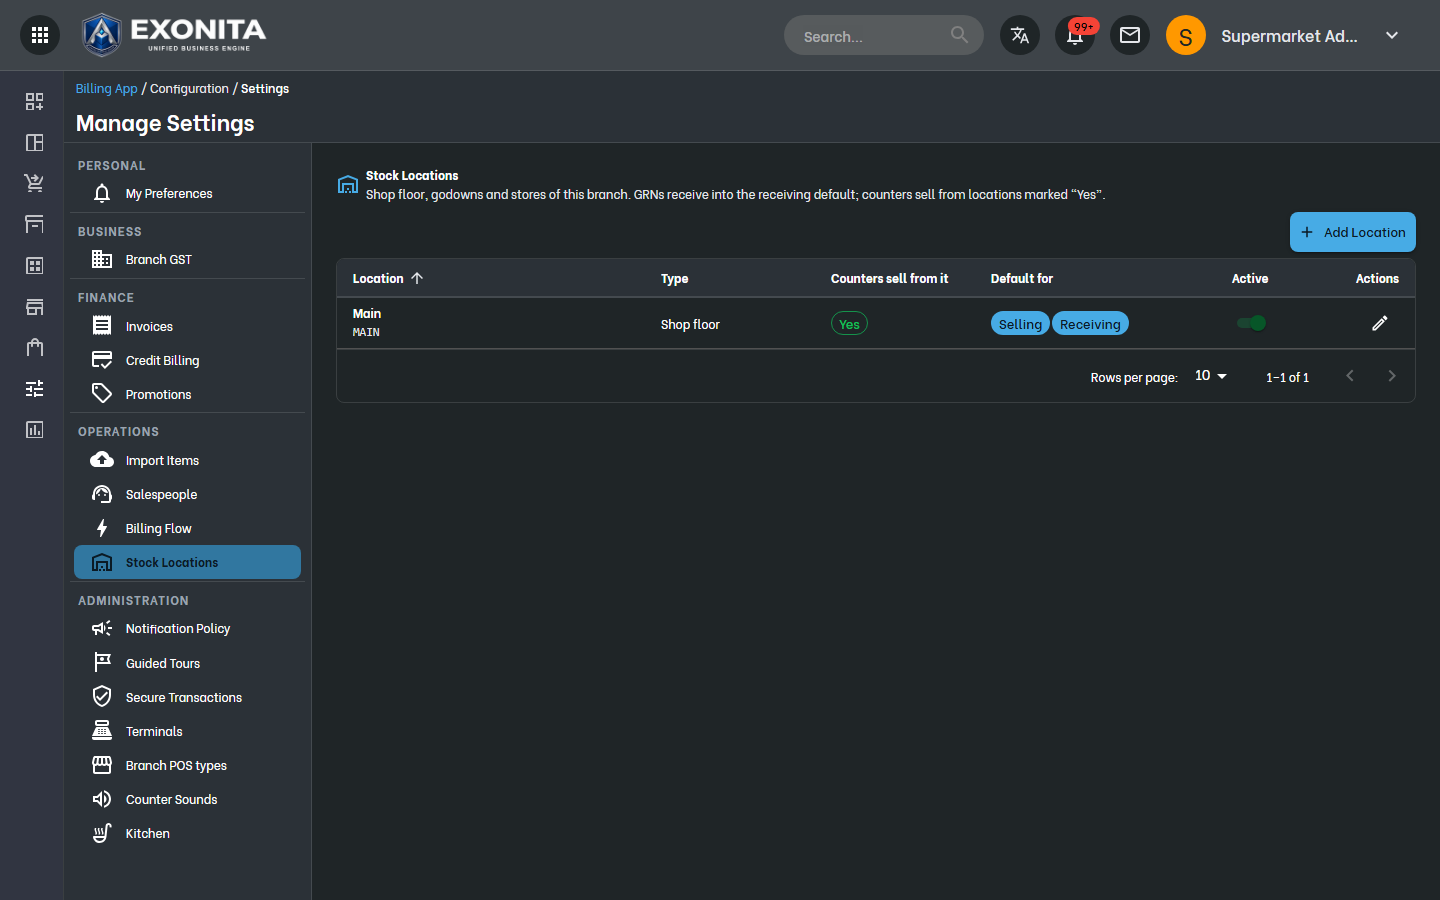
If you keep stock in a store room as well as the shop floor, add it in Settings → Stock Locations with Add Location.
You'll see: GRNs receive into the receiving location, and counters sell from locations marked Yes.
Task 17
Check and approve expenses
See the cash paid out of tills, approve it and set spending limits.
WhereCommon App → Expenses
-
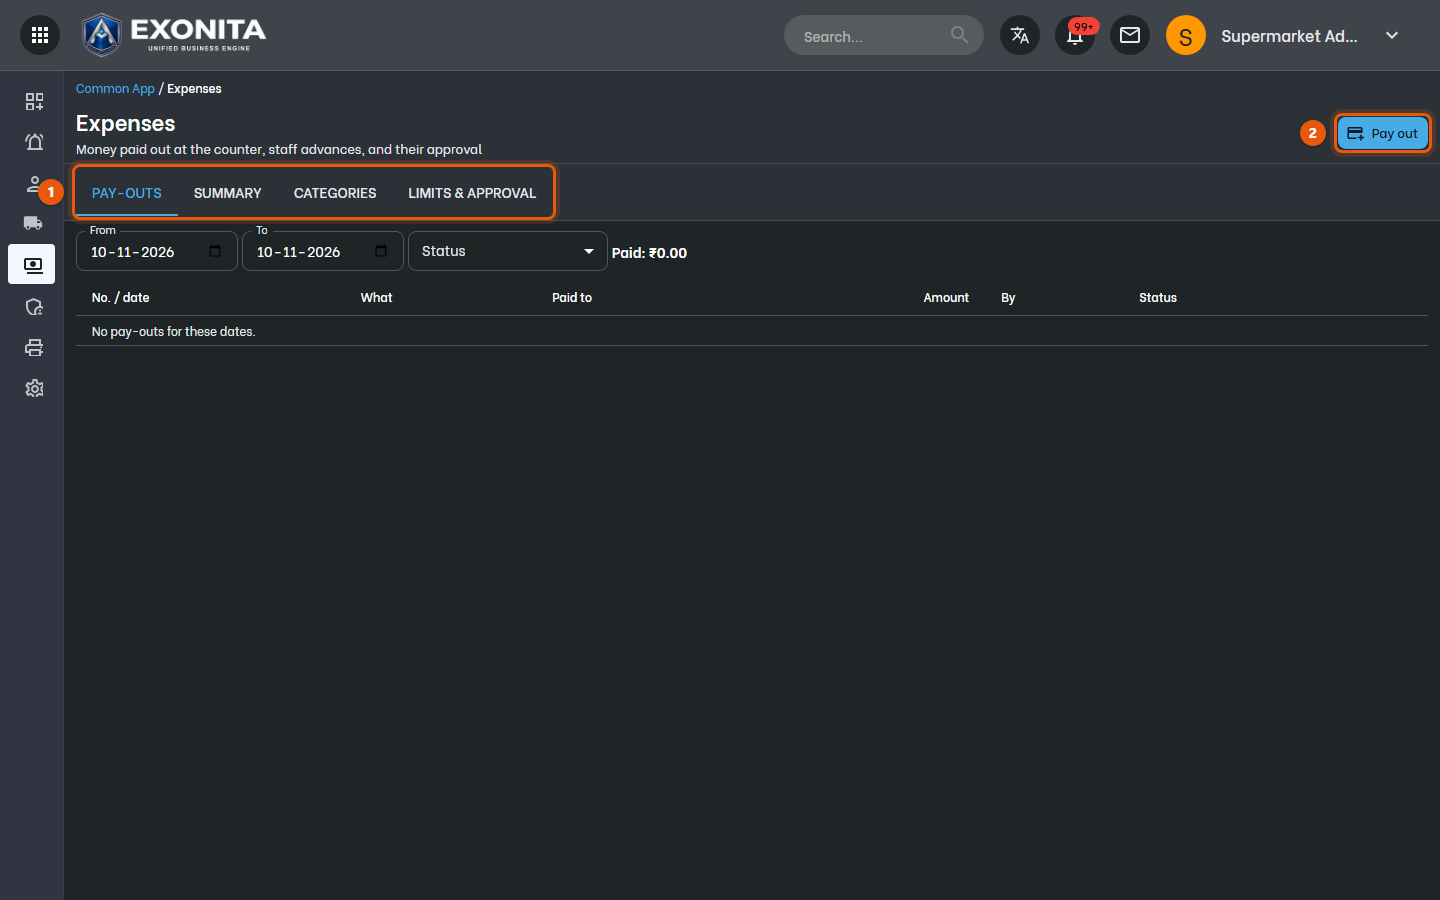
Open Common App → Expenses. PAY-OUTS lists money paid out, with who paid it and its status. Select Pay out to record one yourself.
You'll see: Use SUMMARY for totals by category, CATEGORIES to set up expense types, and LIMITS & APPROVAL to decide which pay-outs need your approval.
Task 18
Close the business day
Check every till, clear open orders and close the day.
WhereBilling / POS → Day Close
-
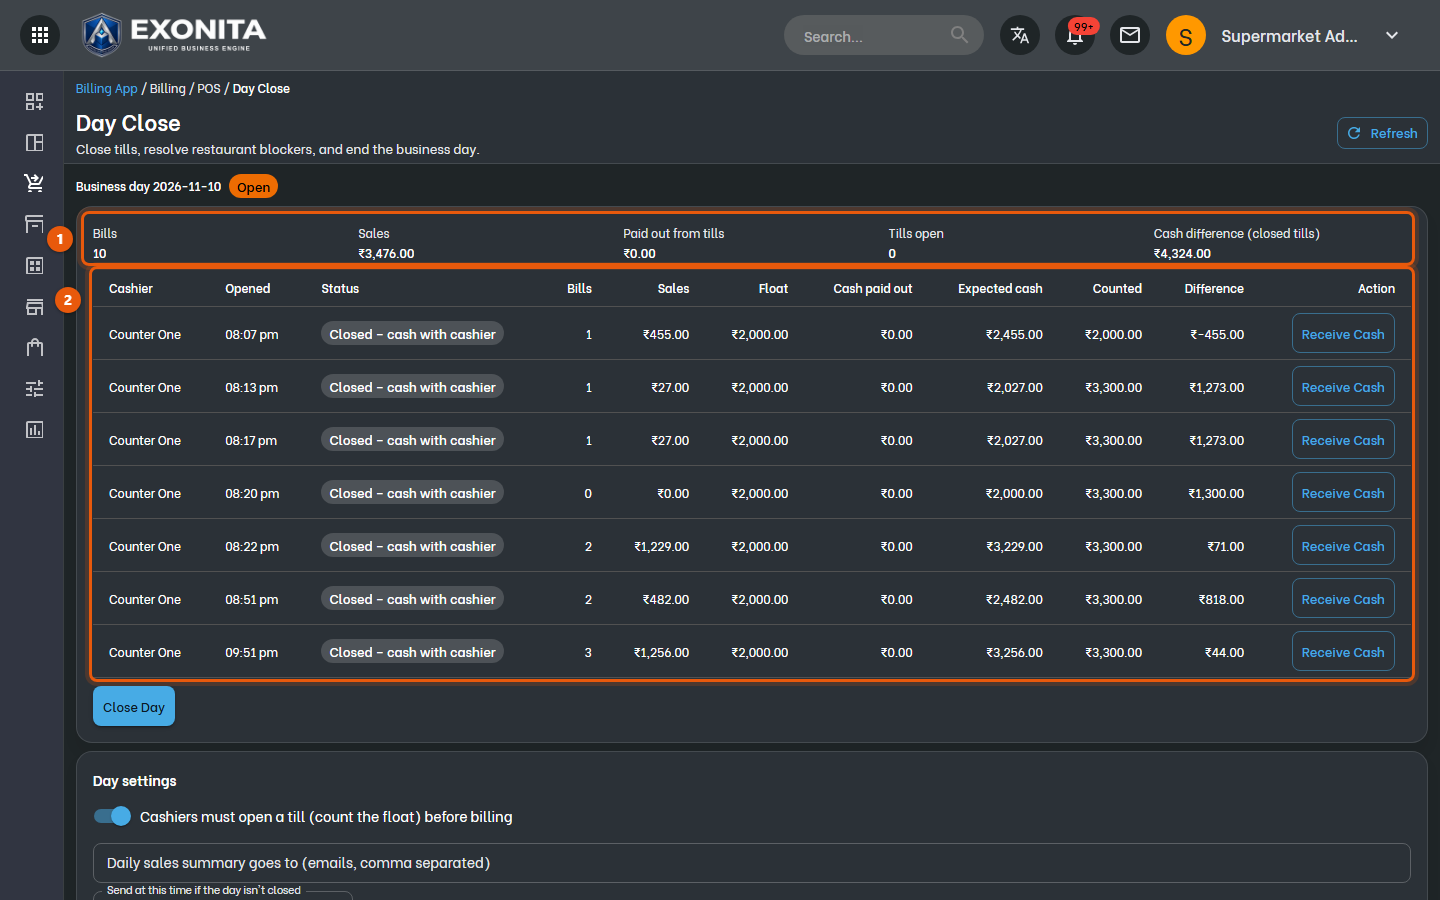
Open Day Close. The top shows Bills, Sales, Paid out from tills, Tills open and the Cash difference of closed tills.
You'll see: Below, every till is listed with its float, cash paid out, expected and counted cash, and difference.
-
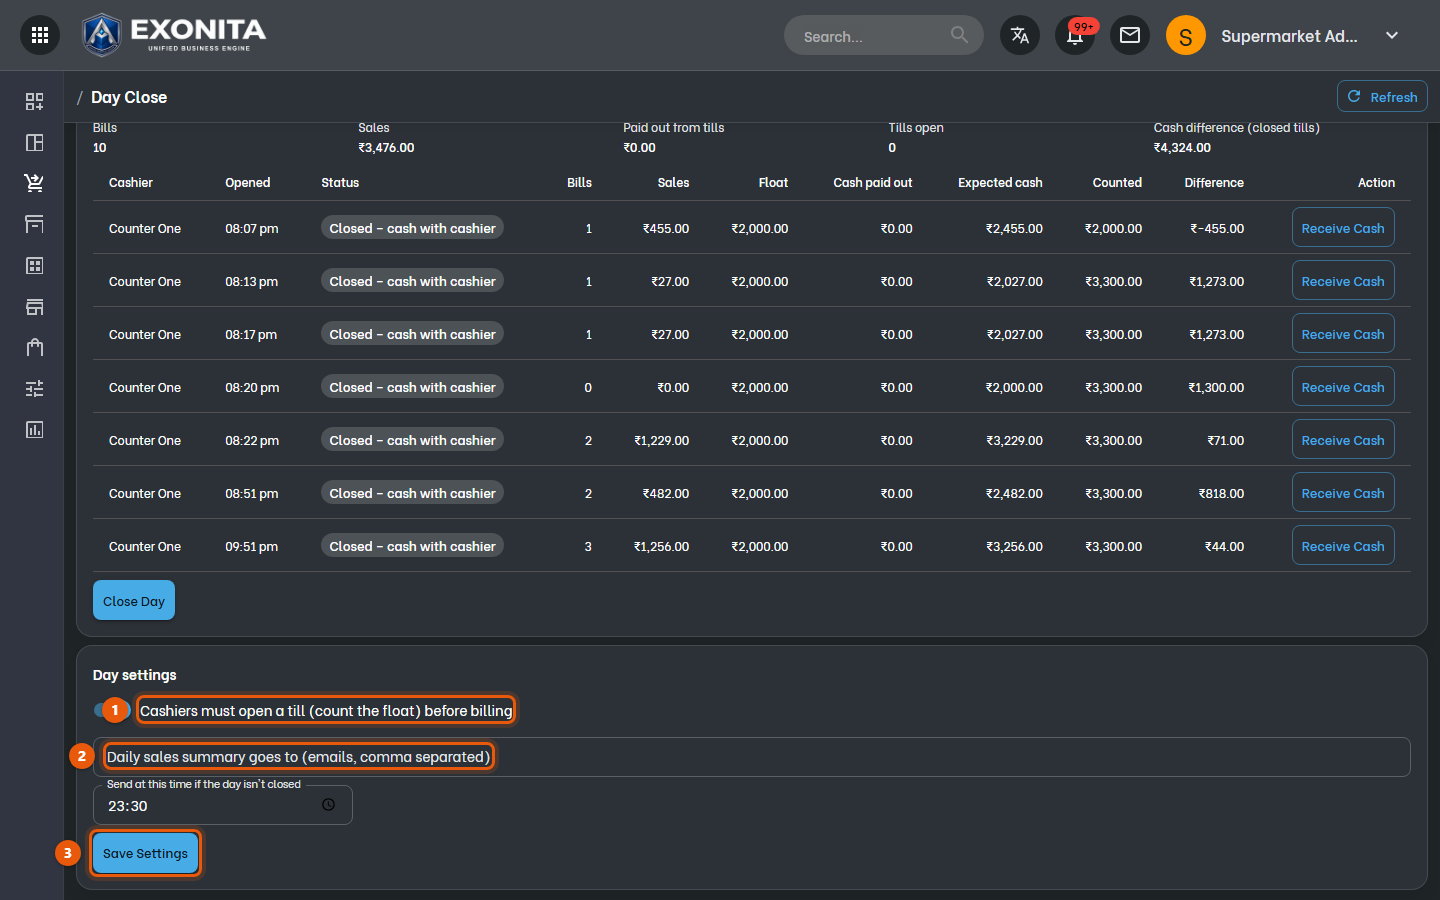
At the bottom of the page, under Day settings, choose whether Cashiers must open a till (count the float) before billing, who gets the daily sales summary by email, and when it is sent if the day isn't closed. Select Save Settings.
You'll see: With the till switch on, the counter asks every cashier to open a till first.
-
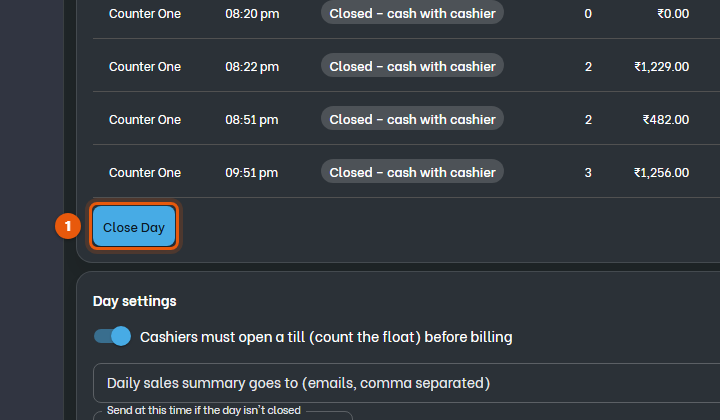
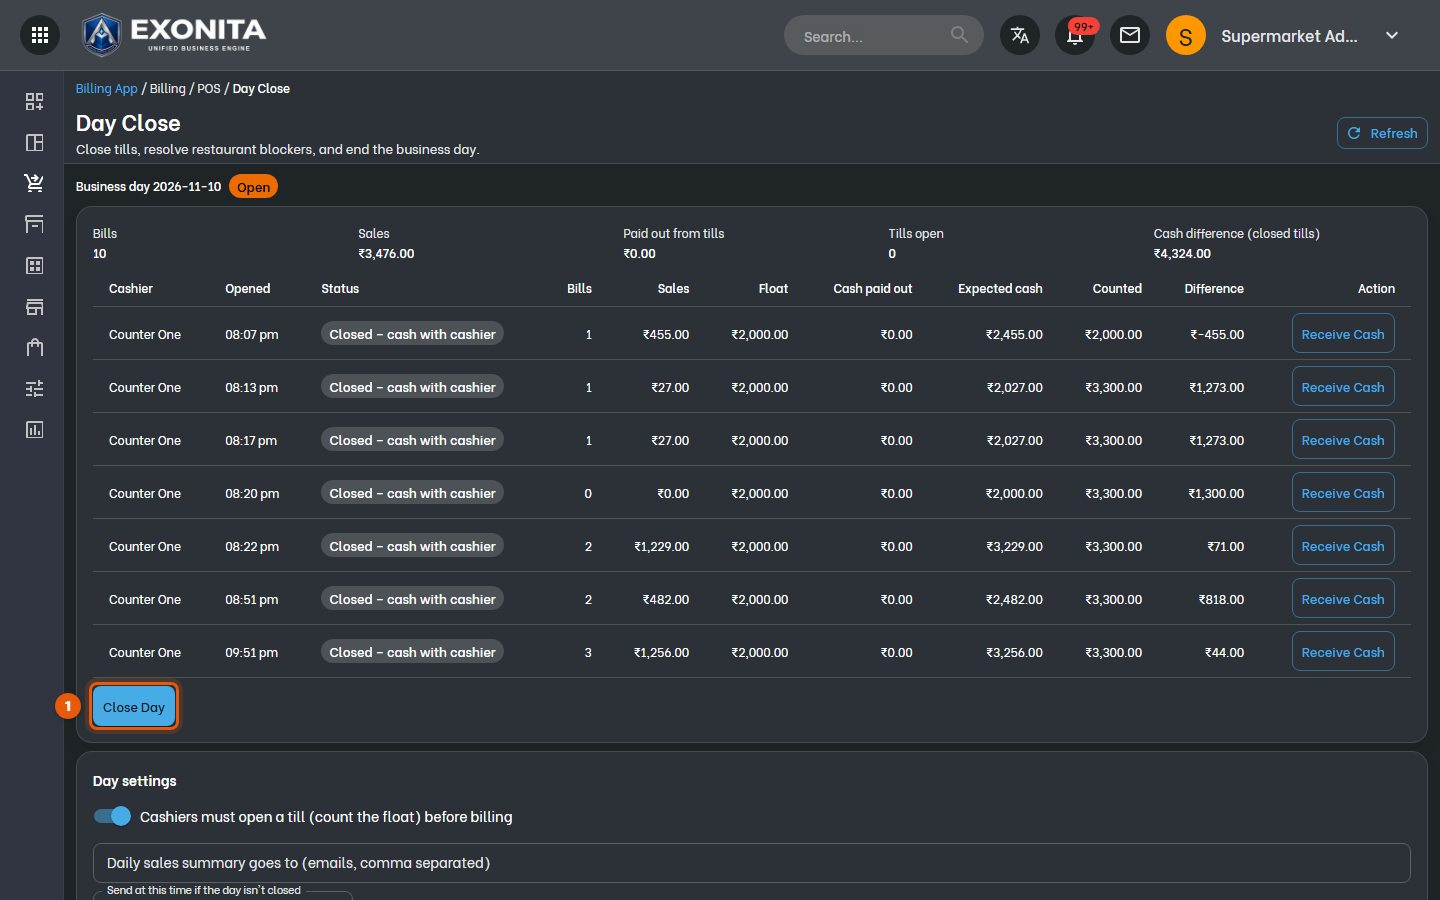
Receive the cash from each closed till. Select Close For Cashier for any cashier who has left. When every till is closed, select Close Day and confirm.
You'll see: The day is closed and the daily summary is emailed to the people in Day settings.
ImportantAfter the day is closed, no more bills can be posted for it. Until a day is closed, the next day's tills can't open.
Task 19
Check sales and reports
See how the store is doing and file your GST.
WhereDashboard / Report
-
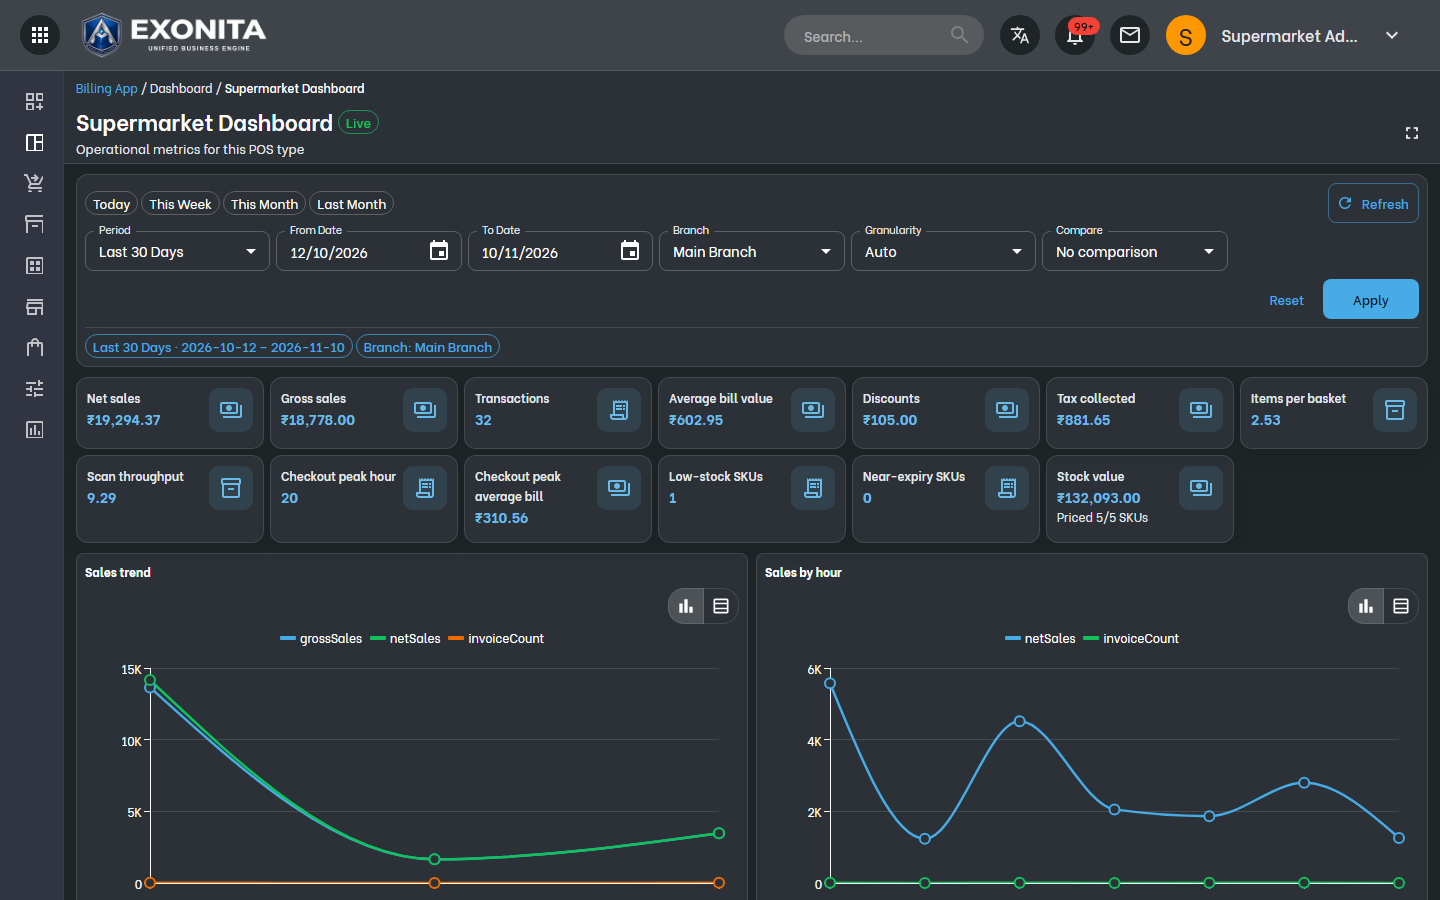
Open Dashboard → Supermarket Dashboard for sales, bills, basket size, top products and stock value.
You'll see: Choose Today, This Week or This Month, or set your own dates and select Apply.
-
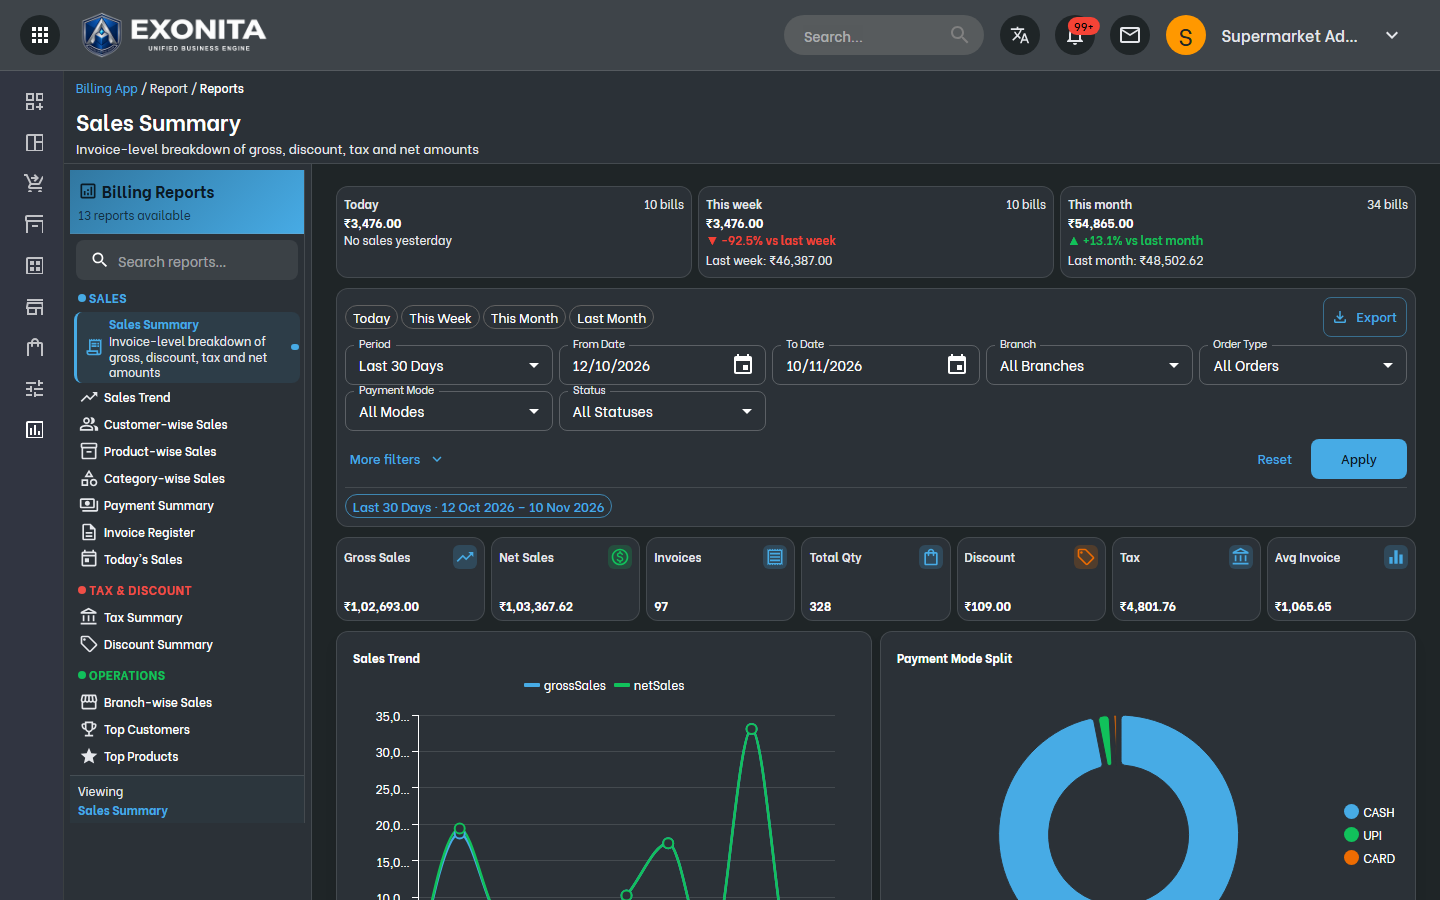
Open Report → Reports and choose a report on the left, such as Sales Summary or Today's Sales. Set the dates and branch, then export it.
You'll see: The report opens with your filters.
-
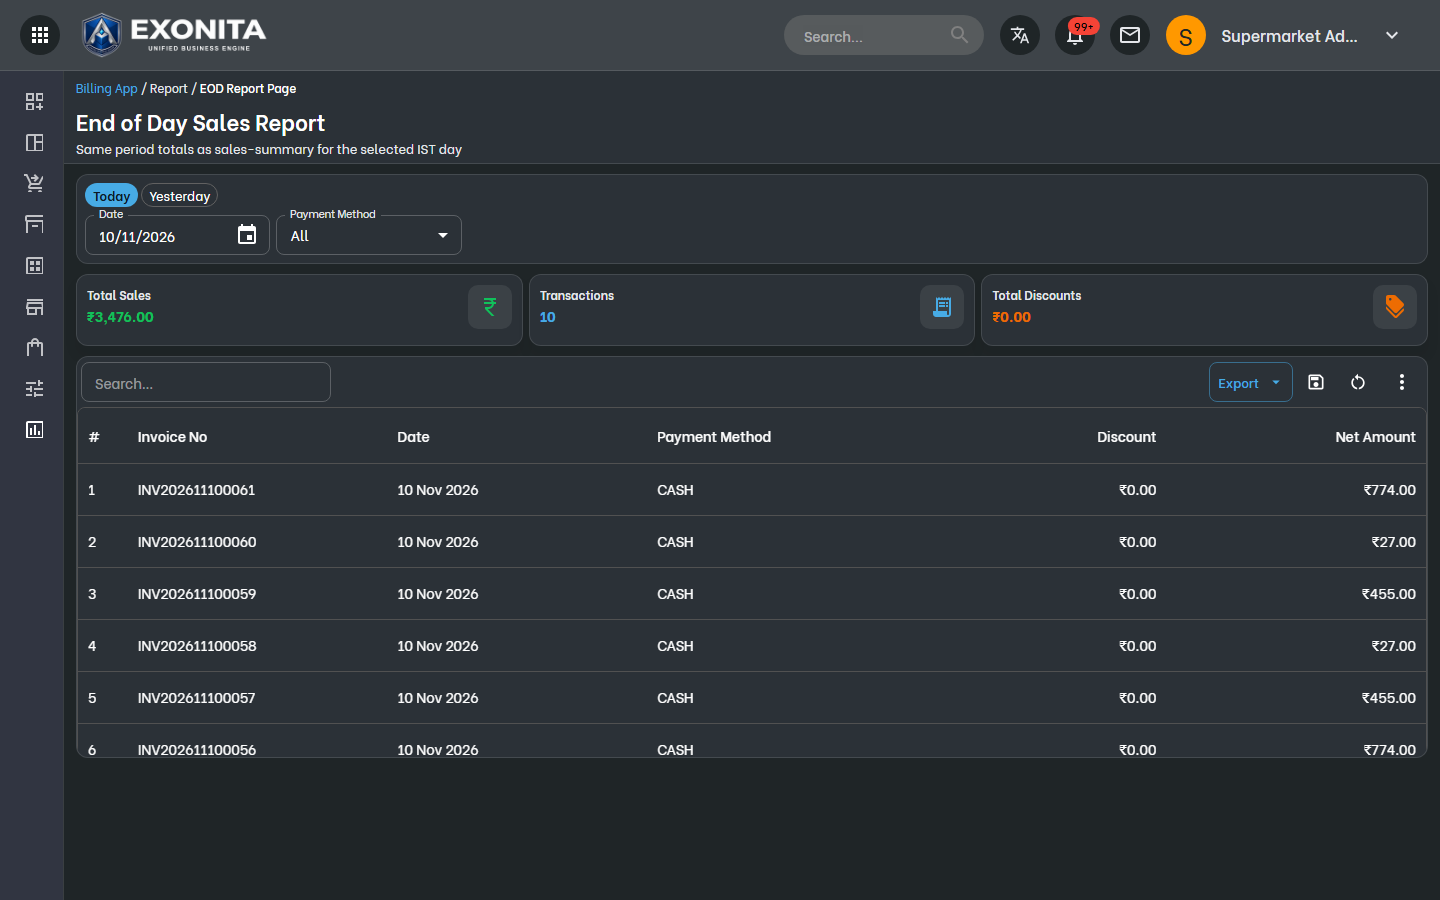
Open EOD Report for a day's totals by payment mode, tax and cashier.
You'll see: Use it to check the day before you close it.
-
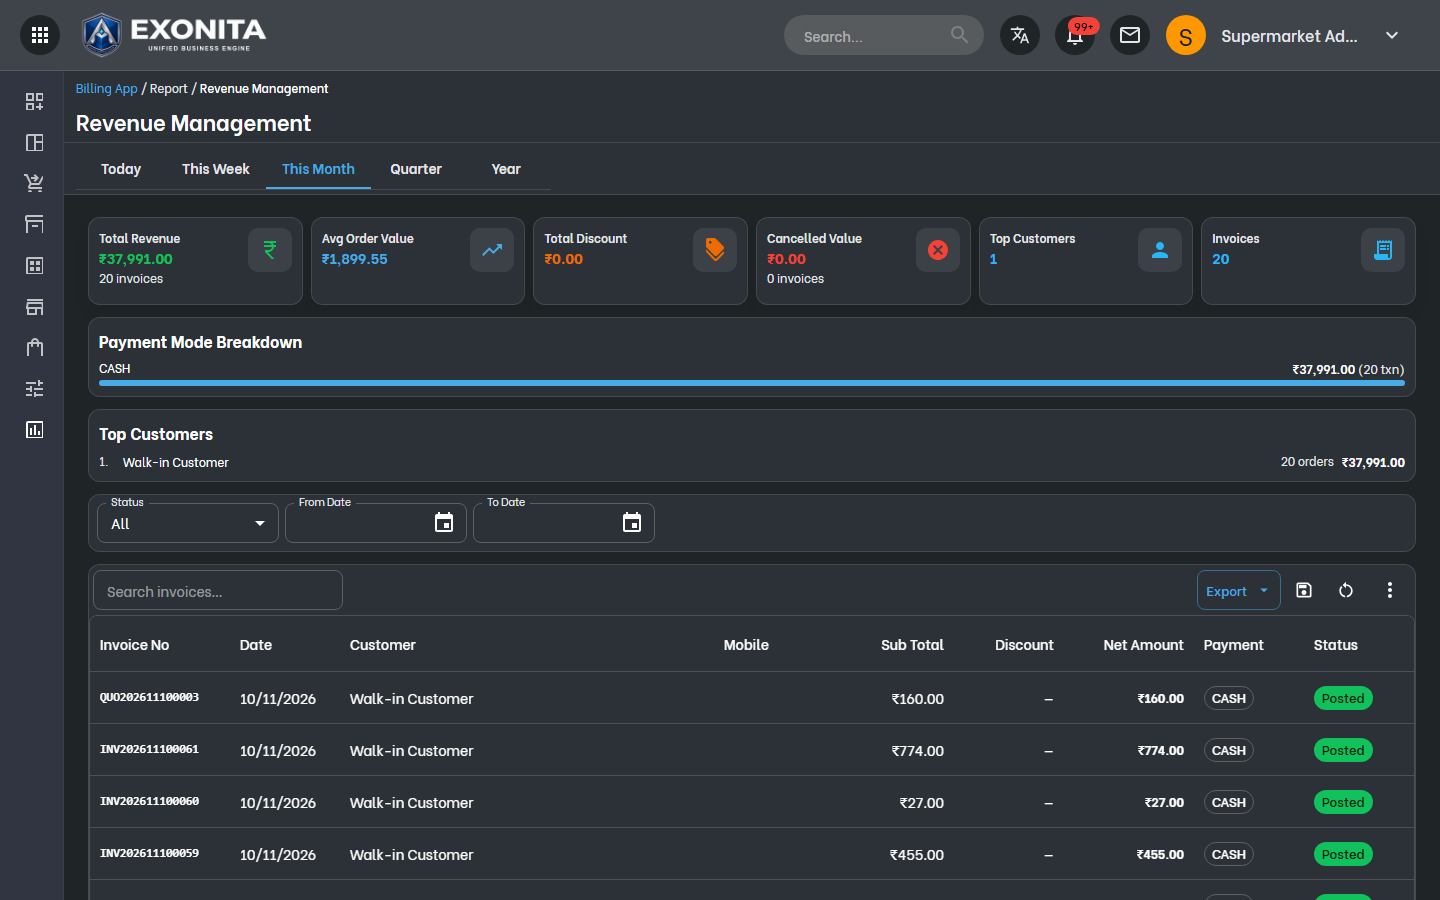
Open Revenue Management for revenue, average bill, discounts and cancelled value, with the split by payment mode and your top customers.
You'll see: Select Today, This Week, This Month, Quarter or Year.
-
For GST filing, open GST Returns and choose the Tax period. It sums up the month's invoices, credit notes and tax as GSTR-1 tables and the GSTR-3B outward supplies.
You'll see: Select Download GSTR-1 JSON and give the file to your accountant, or upload it on the GST portal.
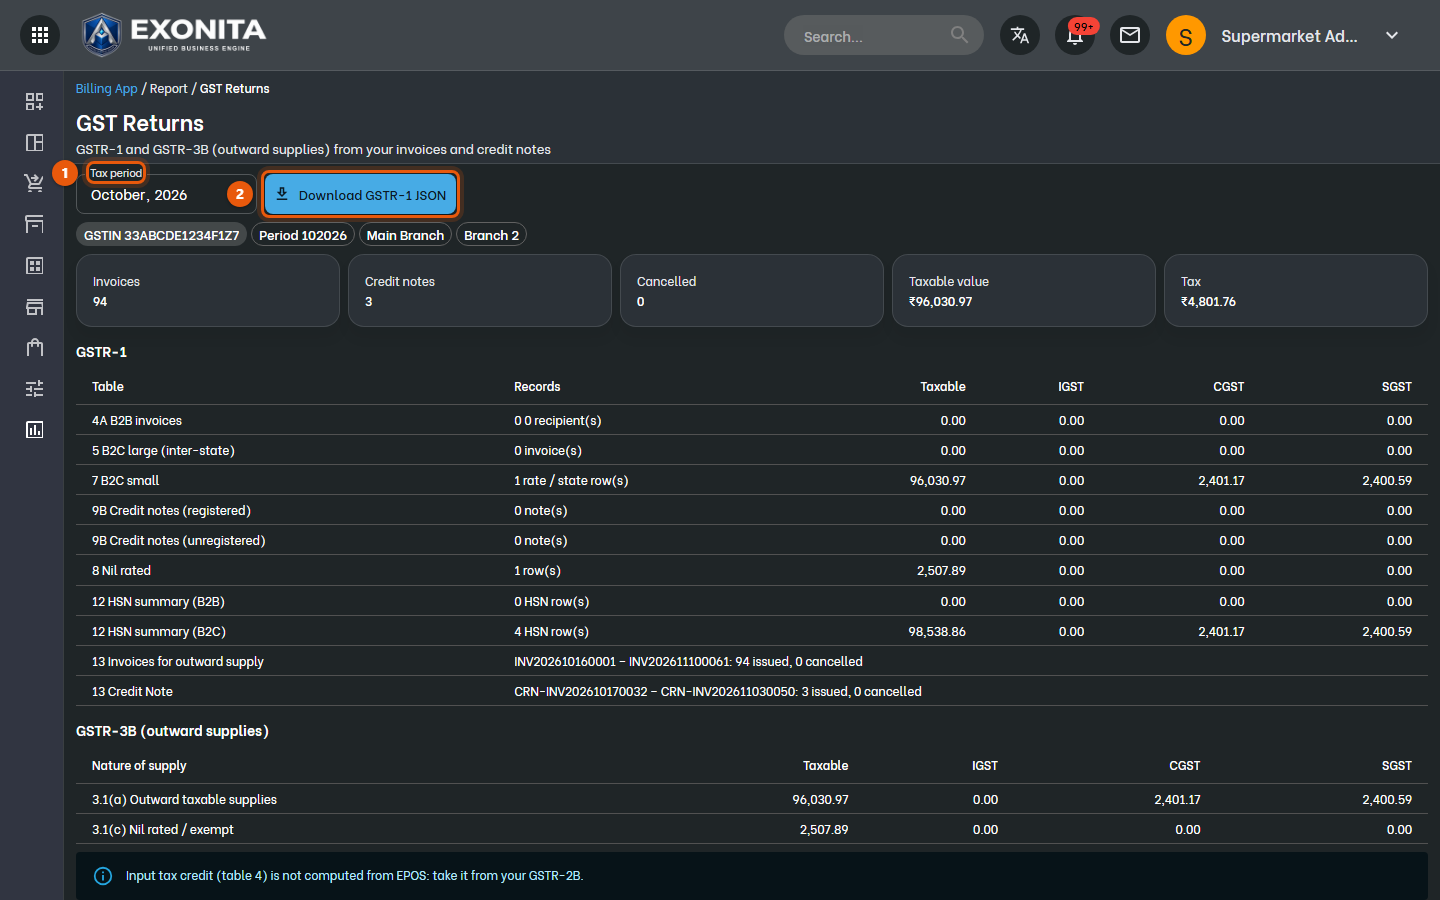
TipThe figures come from the bills posted under your GSTIN in Company Profile (or the branch's own GSTIN in Branch GST).
Task 20
Set delivery zones and message customers
Charge the right delivery fee and send offers on WhatsApp.
WhereCatalog Setup → Delivery Zones / Configuration → WhatsApp Marketing
-
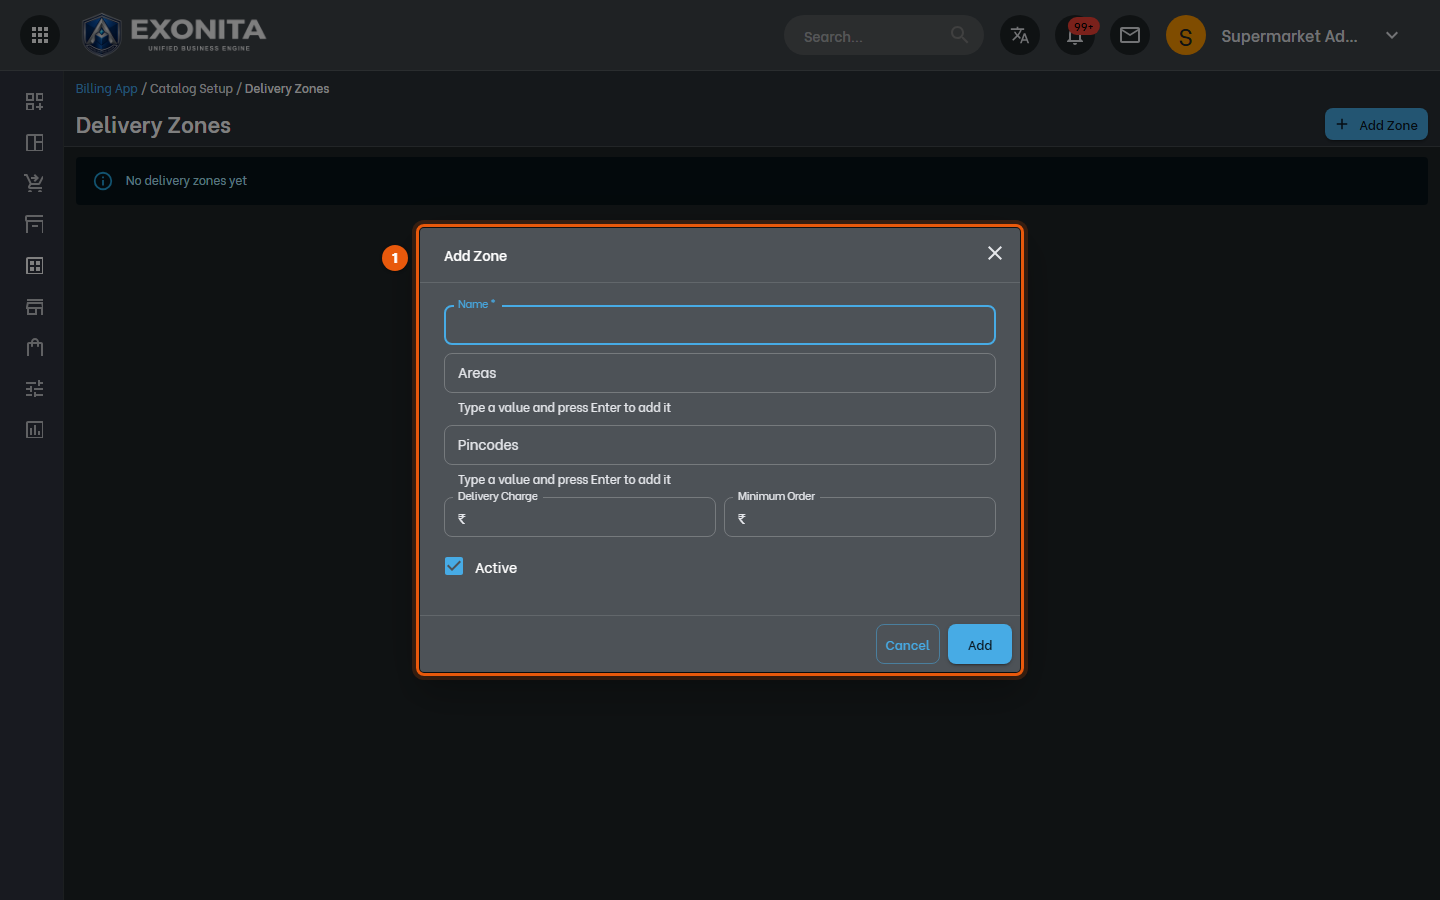
Open Delivery Zones and select Add Zone. Enter the areas or pincodes, the Delivery Charge and the Minimum Order, then save.
You'll see: Delivery orders to that zone get its charge. Zones are set per branch.
-
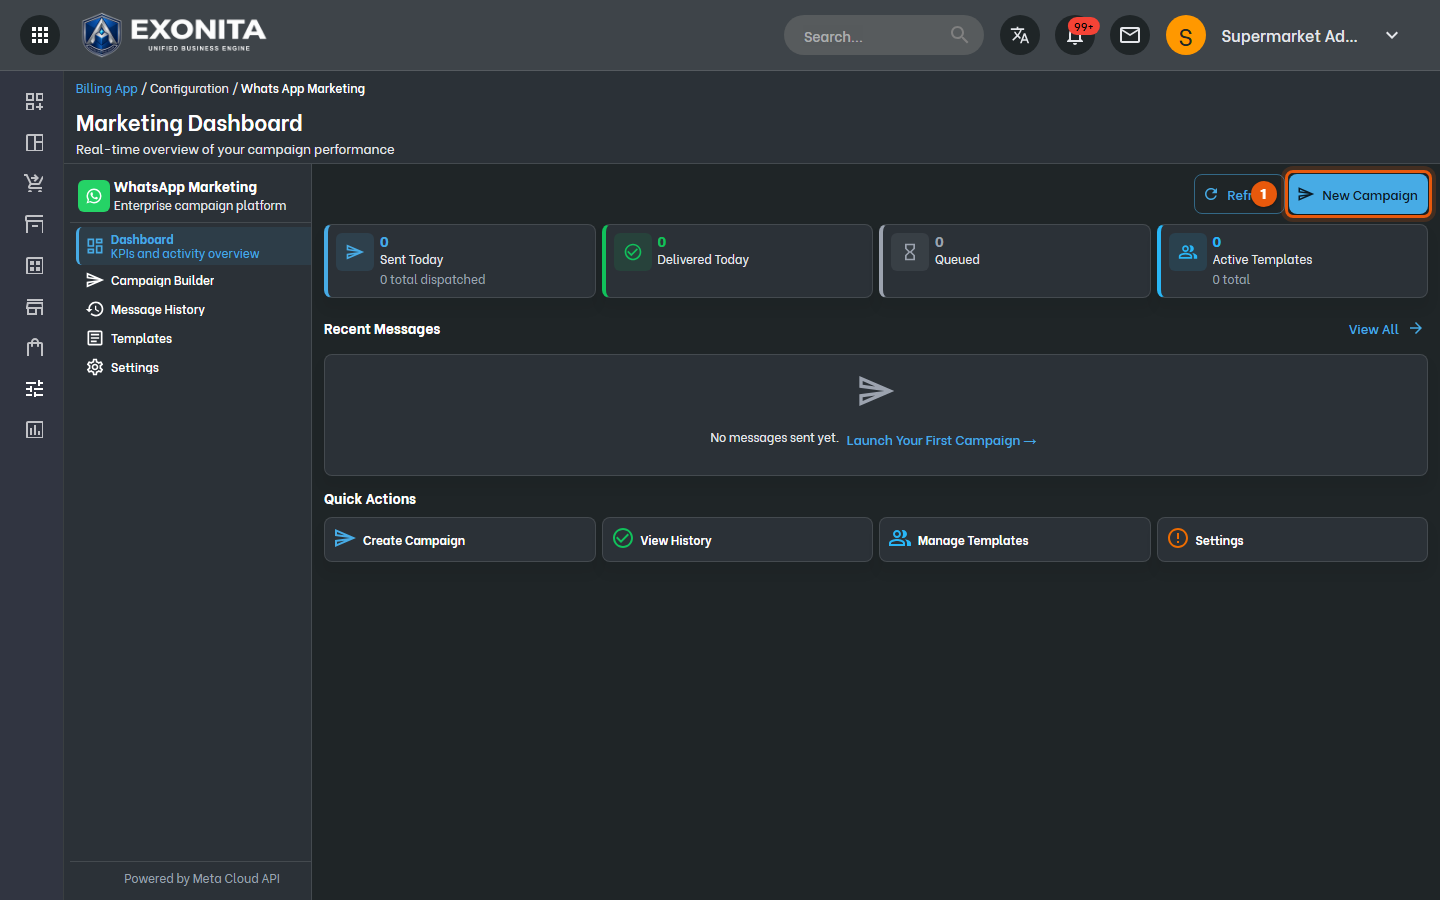
Open WhatsApp Marketing and select New Campaign to send a message to your customers.
You'll see: Sent Today, Delivered Today and Recent Messages show how your campaigns went.